By Coover5
#4784930
I figured I'd start a thread for every one to share their pack advice that doesn't fit any where else. I'll get us started.

Even if you have a perfect proton pack you'll want another one. I love my proton pack but that doesn't stop me from wanting more. As crazy as it sounds one isn't enough. Like anything you can collect having one proton pack is just the start of the pack bug. The variety of packs you can have is huge. GB1, GB2, EGB, RGB, GBTVG, semi-hero, stunt, hero, lights, no lights, sound, no sound, resin parts, metal parts....you get the idea.You'll want one of each.

I was surprised to find out my back can touch the cross bars of the Alice frame if I bend over too far. Not a huge problem but finding out hurt quite a bit. If i ever have time I will put some padding there to avoid hurting my back.

You are going to smack your proton pack into everything when you first put it on. Have some paint ready for touch ups. Try to get an idea of how big the pack is by looking in a mirror. Specifically a side view so you can see how the pack sticks out. I'm extra cautious about it but I still have to go over bits and pieces. If you have a pack with metal pieces you may also end up putting dents into walls.

That's the only advice I can think of for now. Please feel free to add your own.
PssdffJay, Sephiroth liked this
By Coover5
#4785094
If you have a job and patience you probably have the budget for a nice pack. If you're like me and you get paid every 2 weeks then you get 26 pay checks a year. Putting just $40 of each paycheck into a proton pack account will get you $2,080 in just 2 years. GASP!!!!!!! TWO YEARS? Yeah, that seems like quite a long time but when you think most of us have wanted a pack for 10, 20 or 30 years 2 years is a drop in the bucket. You can also add extra money when you get bonuses, cards with money or overtime. $40 is an amount almost every one could manage but I'm sure most could put away more than that.
By Mat
#4785108
Plan ahead; take your time and do some research; look at the reference images and study the available plans. If you aren't sure about something; tool, procedure, methodology or otherwise, ask! Exploit and use that search button! That's what it's there for; 90% of the info is here...possibly buried deep...but that button is a godsend! Patience...is a virtue and it can be either your best friend or worst enemy! You don't need to have or wait for all of your parts to start building; work with what you have on hand, and as parts arrive, add them! :mrgreen:

Refer to these lists for tap and drill bit sizes
http://www.newmantools.com/tapdrill.htm
http://www.shender4.com/thread_chart.htm

This list for inch and decimal equivalents
http://www.engineeringtoolbox.com/inche ... d_471.html

And this if you need some practice reading a tape
http://www.rulergame.net/
By Hammer
#4785120
My 2 cents would be reference many photo different photo angles as you build. Especially if you're doing a scratch build. My mental image was way off in terms of proportions when I first started. The pics def helped set my head Right as I progressed. I whole heartedly agree with Mat.... search, search, search. The info is here and just waiting for you. Sometimes you may be knocking the dust off of an old tid bit but there is a treasure trove of knowledge here!
User avatar
By Hoot
#4785138
Hmmm...
Build a spreadsheet with your costs, parts, date of order etc.

This way you can keep track of what youve ordered and where your budget stands
travisccook liked this
#4785144
Hammer wrote:My 2 cents would be reference many photo different photo angles as you build. Especially if you're doing a scratch build. My mental image was way off in terms of proportions when I first started. The pics def helped set my head Right as I progressed. I whole heartedly agree with Mat.... search, search, search. The info is here and just waiting for you. Sometimes you may be knocking the dust off of an old tid bit but there is a treasure trove of knowledge here!
I agree with this. I'm getting my aluminum parts in now and I'm really surprised by how small some of these pieces are. For some reason I just expected them to be bigger and had I built them from scratch I would have been way off in my measurements.
#4785295
I don't want to speak for Nick here, but I did that before and the black has a hard time sticking to it and it isn't accurate at all. The screen used shells had gray primer on them, but no silver anywhere. Chances are if the black chips off it won't conveniently leave the silver behind giving it that metal look everyone is hoping for, instead both layers will come off leaving behind the shell color.

Again, I don't want to answer for Nick, but that is my experience in that area.

Best advice I can give is be patient, and don't get discouraged. If you DO get discouraged take a break, step a way, think about how the problem can be fixed and come back with a fresh attitude. Stay positive. And again, patience. Neither Rome, nor a proton pack was built in a day.

Check reference pics. Depending on how accurate you want your pack to be there are literally pics of every inch of the screen used packs and they will be your saving grace. Enjoy yourself.
By gbmatt
#4785299
Best advice I can give is be patient, and don't get discouraged. If you DO get discouraged take a break, step a way, think about how the problem can be fixed and come back with a fresh attitude. Stay positive. And again, patience. Neither Rome, nor a proton pack was built in a day.
This can not be stressed enough. Taking a break will likely help you relax and come back to the project with a fresh state of mind. All the frustrations that do build up have passed and you can work in peace.....for a while at least haha.

On top of that, if you are not happy with how your pack looks, if you think it doesn't look good enough, if it's "Not as good as the packs in the film:"

DO NOT WORRY!!!!!

The packs that are being built now could actually be considered superior to those packs. We have so many resources at our disposal. We have tools, we have the talent.

Have fun building it. It's supposed to be a fun hobby, make it fun!
#4785331
Lewis Tully wrote:I don't want to speak for Nick here, but I did that before and the black has a hard time sticking to it and it isn't accurate at all. The screen used shells had gray primer on them, but no silver anywhere. Chances are if the black chips off it won't conveniently leave the silver behind giving it that metal look everyone is hoping for, instead both layers will come off leaving behind the shell color.

Again, I don't want to answer for Nick, but that is my experience in that area.

.
Nail on head. I've never seen a silver under coated shell chip and weather how people expect and it really is a gamble if your black coat will dry right, if at all. And above all it's not accurate.
Lewis Tully, KagaSakai liked this
User avatar
By CPU64
#4785460
Don't cross the streams! :)
J/K!!

I just don't know exactly why, but silver is just one of those pigments that do not play well with others.. When I sprayed my Halo armor back in the day, the top coat reacted so bad with the silver, that both top and clear coats peeled off like sunburned skin..

Also, flat black is the correct paint the use, just needs a bit of buffing when dry.

Don't use a carriage bolt through the vertical blade of the alice frame. The square neck requires an oversized hole which will cause the frame to break with use. Use a round head slotted machine screw instead.

If you get an aluminum thrower, do not use tools to install any over the 6-32 cover. Those tiny threads are fragile and hand tight is enough.
lannyjack liked this
#4785464
My advice: if you're scratch building picture it in your mind before building it. For that I drew 3D schematics (roughly), writing dimensions on them so that I could "feel" what I was trying to achieve. Because looking at a 2D schematic wasn't enough for me.

Then by writing the part's names on my drawings I learned to know the proton pack, I actually felt quite "Egon". ;)
#4785517
nick-a-tron wrote:
Lewis Tully wrote:I don't want to speak for Nick here, but I did that before and the black has a hard time sticking to it and it isn't accurate at all. The screen used shells had gray primer on them, but no silver anywhere. Chances are if the black chips off it won't conveniently leave the silver behind giving it that metal look everyone is hoping for, instead both layers will come off leaving behind the shell color.

Again, I don't want to answer for Nick, but that is my experience in that area.

.
Nail on head. I've never seen a silver under coated shell chip and weather how people expect and it really is a gamble if your black coat will dry right, if at all. And above all it's not accurate.
Does this apply to the thrower? I didn't silver coat my proton pack but I tried it on the thrower kit. I think it worked. I was able to lightly scratch the black paint and see the silver underneath. How it will behave if a serious scratch happens I don't know...
By gbmatt
#4785519
That's just in general in my opinion. The problem is that most stuff that gets scratched is not going to just take off the black paint. On the pack and the thrower both. If anything scrape it away first, then use a small brush and some silver paint and paint in the chipped away area. Or go the Rub n Buff route. I still love using RnB. A lot of it also depends on how heavily you like your stuff weathered
#4785522
- Never leave the Ion Arm end cap completely bare - it should have at the very least some swatches of black paint (Stantz and Zeddemore Semi-Heroes) or be fully painted with a bit of weathering around the edges.


- Use stainless steel 0.5" 6-32 button-head bolts for attaching your rear grip to the thrower handle; they look very similar to the 1/8" pop-rivets, but they're completely modular should you need to remove your grip at any point.


- When drilling holes for mounting parts to your pack, start with the smallest bit and slowly drill, working your way up to the desired drill-bit. This may be tedious, but it ensures even holes and helps prevent drill-bit "walking".


- Don't use a full foot of the green 1/4" tubing on the thrower; you only need about 6.5" - 9" (depending on the look you're going for).


- Make sure to wrap the split loom from the thrower to the pack with strips of electrical tape every 7" or so. This will help prevent the loom from getting twisted out of shape.


- For the blue 1/4" and red 5/32" tubing, use polyurethane (instead of polyethylene) for flexibility - especially for the thrower tip and connection between the long resistor to the Clippard fitting on the Ion Arm. Also, avoid 1/8" tubing - get the accurate 5/32" - the extra 1/32" really does make a difference!
portugueseGB, lannyjack liked this
#4785645
Dan AKA wrote:For mounting major parts, leave the glue in the drawer. Only use glue as a last resort or for quick temporary repairs.
Agreed, where you can do, use bolts. If something breaks it's easier to get it off and repair it without damaging the pack more by trying to prise something that's glued down.

The best advice I can give is to be slow and methodical in your build. These things take time to make them look good and rushing your build will only show at the end. Try not to put a time frame on when you want it finished by. It's done when it's done. Trying to get your pack built by a certain time will only put undue stress on you as you try to make that deadline and it'll take away some of the fun of the process.
#4785681
Avoid trying to do everything at once. I try and do one thing a day (as time allows) even just something small. You'll be surprised how fast a pack can get built this way. I also agree with walking away from the project. Go see a movie, spend time with your better half. It will keep the project from getting frustrating.

Don't go full CRAZY with the weathering. Subtle goes a long way. I only do the Ion Arm cap and the grips. Packs get knocked around enough in real life.

Leave room for upgrades. Building the perfect pack the first time is going to take all the fun out of owning and improving it.
Full-Roaming-Vapor liked this
#4785718
Full-Roaming-Vapor wrote:
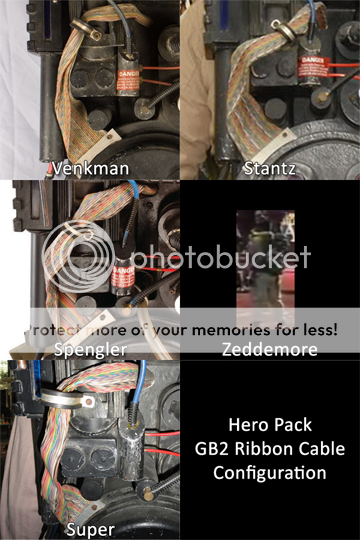
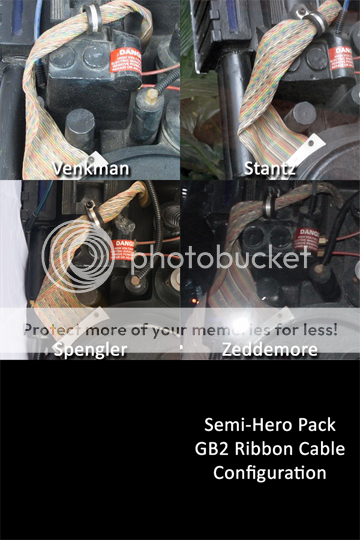
Lewis Tully wrote:Don't over twist your GB 2 ribbon cable. Or don't twist at all.

Why? Is it fragile?
Some people twist their Spectra cables a little too tightly. The screen-used packs had them loosely wrapped.

Here are some graphics I was working on a few days ago...

Image


Image
Lewis Tully liked this
#4785855
If you don't know what you are doing ask for help. Walk away and admit you don't know how to do something. Set aside time to work on your project but don't let it interfere with your life. Look at reference photos, look at the part for your pack, look at the reference photos, look at the part for your pack, align it on your pack and right before you are about to mount it....Look at the reference photos. Take breaks, refresh your mind and don't overload it with " I need to do this" and "I need to finish that." It will be something you are proud of if you take your time with each piece.
    Spengler/84 wand Gun Track

    So...I had more than a little problem with dis[…]

    Preview for #2 on DH's page. https://www.darkhors[…]

    The_Y33TER , since the majority of the maker sc[…]

    PKE Meter build project!

    DO you have this files on sale?