By ecto88mph
#4804631
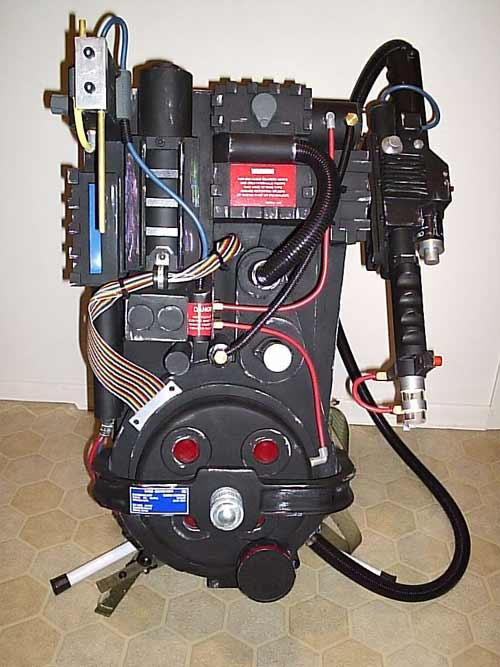
I am in the finnal stages on my pack build. I am using a studio creations vacuform shell.

Over the past few days I have fiberglassed the inside and cut out the holes. Now im on to painting. Which brings me to my question. Im looking to have it look worn and used. Like its been banged around fighting ghost for the past 30 years......ok maybe not that bad but you know what im getting at.

Any tips for painting or any other ideas.

I seem to recall a pack on here a while back that had a cracked cyclotron lense. however i could not find it.

(kind of hoping the used and abused look will help hide any inperfections I had durring the build phase.)
By falconnl
#4804636
Well what i would suggest are the following steps.

1: Paint your Proton pack silver/metallic.
2. Paint a clear coat on top of that
3. Paint a charcoal black on top of that
4. Use a fine grid (800/1000) the sand away the black. This is the most accurate way to do wear damage, you can use some hard grid (60/80) for the more aggressive damage.
5. Find some "Fullers Earth".
6. Put some Fullers Earth in an old sock and just dab in the spots you want.
7. Brush it a bit around with a dry paint brush
8. Seal the Fullers Earth with a clear coat.

You can add certain special features like some diluted yellow paint where the cable could have been leaking, add the cracked lences. A really easy but effective way is to age the waring labels, labels are alway the first thing that gets de-colored or damaged.
By 35FT_TWINKIE
#4804660
Alan Hawkins wrote:I agree, I just let my pack get banged around on it's own. Excessive weathering looks off to me. Like the pack got into a fight with a can of silver paint. jmho
I concur.

I finished my aluminum thrower, and I'm not even close to done with my pack and my thrower has already weathered very nicely with natural dirt and dust. It's also showing aluminum through on the corners and edges just from being handled while working on the pack.

My suggestion would be to prime it with grey primer and paint it to your liking. Buff it out with a microfiber towel and if you want, add in some mothers earth with the sock method. Then, use a feather duster to dust off the excess and the mothers earth will, for the most part, naturally stick to the areas it should be in...things like corners, recesses, and valleys. Do NOT paint over the mothers earth. It will stick just fine without any clear over it and if you ever want to change the look of the pack, you can wipe it off completely with a damp cloth.

Also, I would forget about doing any under lying silver or metallic painting. IMHO, that has always worked better in thought than in practice. Plus, the more layers of paint you add, the more you risk the paints not settling right and reacting badly and ruining your paint job.

If you do it correctly, with the grey primer, the black will naturally weather away (you can even add in some weathering yourself) and the underlying primer will show through nicely. Much easier and much more efficiently than using silver or metallic undercoat.

The key to weathering, and I've heard it 1000 times over, is that less is more and usually when you think it's "enough", it's already over done.

Good luck! Don't forget to post pictures.
User avatar
By syckotheklown
#4804662
I think dry brushing doesn't look bad at all if done right. I guess it all depends on what your going for. If you have the patience to wait for it to get banged around and such, then the natural ware and tear will do the trick. But you can achieve the same effect if you do the silver dry brush right. Also keeping in mind what parts would be getting more ware and tear while brushing it. My packs drybrushing I think looks great. I also went for 25 years worth of day after day usage. I don't think it looks like it was in a fight with a spray can lol
By chibigear
#4804675
Our packs were painted with gloss black, then went over them with 0000 steel woll to dull the gloss where necessary.

Humbrol paints drybrushed carefully (less is more...) and then cinnamon dusted here and there, for rust... Add a dab of PVA glue, then the cinnamon, and it looks so nice rust....

I use the gloss top coat on Star Wars blasters also, it gives me the edge on where I want the paint shine, and how dull the paint is. 0000 grade steel wool is your firend here.

And, for 30 years, let the dust sit where it goes... Do not wipe the pack clean. In time, the dust will adhere to the edges, and places, making the pack look old and used.... I had to clean up a Cyclotron on one of our packs for casting a new one... (No recasting here, just making a cast of my own teflon pan here...)... Pained me to no end to clean up so nice dust finnish, on the pack... Now it looks like new, clean pack with weathering...

Remember, less is more. Add weathering carefully, let it dry, and have a look on it. If you want more, add more. Bit by bit.

And, pics. Please!
By robpenfold
#4804698
I just finished weathering my pack. And I agree with the last few posts, less is more. It has to be subtle and it has to be in places where wear would naturally occur. Subtle dry brushing is great. Sand through to a metallic undercoat can work too. Fuller's earth definitely adds more authenticity. Don't forget to wear your labels. I used some acrylic paint and wiped with a raged till nearly removed. Scotch bright them as well. Also age your hoses and tubes. For the red and blue tubes I used the acrylic paint method and fullers earth on the splitless looms.

When my pack construction was complete and shiny new it looked (to me anyway) like a toy and not authentic. The weathering made it look more real world. So happy I did it.
User avatar
By pyhasanon
#4804706
robpenfold wrote:Don't forget to wear your labels. I used some acrylic paint and wiped with a raged till nearly removed. Scotch bright them as well. Also age your hoses and tubes. For the red and blue tubes I used the acrylic paint method and fullers earth on the splitless looms.
How is this "acrylic paint" technique executed? Not sure if I understand...
User avatar
By halliwax
#4804713
heres a nice little weathering on the pack

Image

Image

this looks the best to me

Image

i truly love these little details from (35FT_TWINKIE)

Image


this is around my goal, i hope i can replicate what WIZ-GB008 did with his grips
Image

this is alittle too much rust for me, but still enjoy it

Image
User avatar
By pyhasanon
#4804719
halliwax wrote:Image
My God... why is there rust on the split loom...?!? Even after 50 years, I doubt a pack would look like that unless you buried it under a clay bank by the ocean... That's too much to me, but to each their own I guess...
By robpenfold
#4804724
pyhasanon wrote:
robpenfold wrote:Don't forget to wear your labels. I used some acrylic paint and wiped with a raged till nearly removed. Scotch bright them as well. Also age your hoses and tubes. For the red and blue tubes I used the acrylic paint method and fullers earth on the splitless looms.
How is this "acrylic paint" technique executed? Not sure if I understand...
I just used a raw umber or burnt umber coloured (sorry coloured has as "u"...I'm Canadian) acrylic paint. I just dabbed it on the labels/stickers with a brush fairly liberally. Let it sit a few seconds then wipe it with a rag. Remove most of it and it looks like some grime accumulation. You could also use very fine scotchbrite to dull the labels down too.

I then immediately took the rag that I just wiped the labels with and wiped down my red/blue tubes to put grime on them. Worked well in my opinion.

I don't have any pictures yet of my weathered pack but when I do I will post them.
PssdffJay, Smeghead liked this
By PssdffJay
#4804734
robpenfold wrote:I just used a raw umber or burnt umber coloured (sorry coloured has as "u"...I'm Canadian) acrylic paint. I just dabbed it on the labels/stickers with a brush fairly liberally. Let it sit a few seconds then wipe it with a rag. Remove most of it and it looks like some grime accumulation. You could also use very fine scotchbrite to dull the labels down too.

I then immediately took the rag that I just wiped the labels with and wiped down my red/blue tubes to put grime on them. Worked well in my opinion.

I don't have any pictures yet of my weathered pack but when I do I will post them.
:nicejobyoudid: Thumbs up on the "u" in coloured eh!

Anyway, Adam Savage has a great video on weathering on the Tested youtube channel. Maybe this will help. When you mentioned the burnt umber, it immediately reminded me of this video.

Smeghead, Sutton621 liked this
By ecto88mph
#4804742
Thanks for all the good info. I think im going to go the light weathering look. Again all good advice.

Ha that super rusty pack looks like it was hanging out with the delorean in the mine (from BTTF3)
User avatar
By Kingpin
#4804764
pyhasanon wrote:My God... why is there rust on the split loom...?!?
It was painted by somebody who didn't have a clue. They might've done it to make it look more "authentic" as a screen used Prop (which it was passed off as at one point).
By gbmatt
#4804767
Actually the rust pack looks like the one of Seans that Profiles in History(I think it was them?) tried to auction off a few years back claiming it was a screen used pack.

EDIT: Somehow I missed your post Ben hahaha. My bad
By ecto88mph
#4805586
Thanks for all the info.

For the record I did go with the Silver undercoat, clear coat. then flat black. Works amazing, and looks natural.

I did some light test weathering, but im going to wait for everything to be on it before I get to into the weathering.

Just to throw my experience in there. I've bough[…]

I have this week commenced my most ambitious proje[…]

I haven't had Xbox Live for a while, but I'm consi[…]

I cut out the middleman and sprayed my pack and ba[…]