
- August 31st, 2012, 7:20 pm#409946
Some people may have already heard rumors of my 3/4 scale proton pack replica. Well I'm pleased to announce those rumors are true and here is my build thread to prove it. Unfortunately I was so focused on the project I forgot to take some photos of a few parts and steps as I was building, but the majority has been documented.
I will also show pictures of all the finished parts after they had been molded, so you will get to see all the finished parts.
If you're interested in buying one of the finished kits see my For Sale Thread.
Using a combination of Stefan Otto's plans, measurements off some screen used packs, along with various reference photos and consulting some known pack makers, I scratch built a complete 75% scale pack replicate. This includes Pack Shell, Bumper, and hardware. If its on a proton pack I've made a 75% version of it.
Here are some pictures from the build.
I constructed the buck using almost entirely 1/4" basswood. I cyclotron was made out of pine.


The bumper was build by deconstructing it down to its basic shapes. Using basswood and thin sheets of plywood I got from the craft store, I was able to create sections of the bumper and assemble it piece by piece. Then using bondo I filled the seems and rounded the edges.


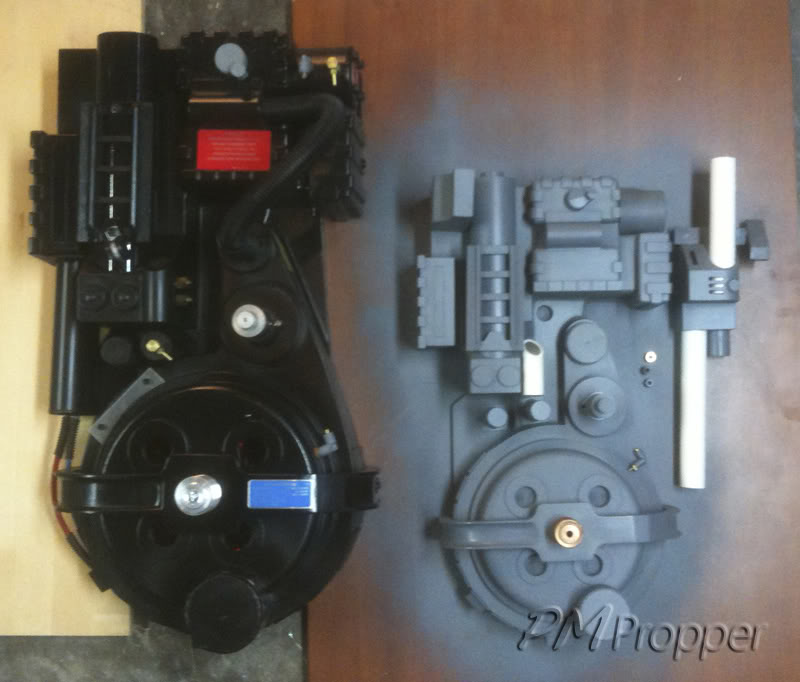
Heres an image taken next to a full scale shell for reference of scale.


Later I was able to find an exact 75% scale REAL bellow.


At the hobby shop I was able to find hexagonal brass tube at the exact scale I needed for the Booster frame, as well as strips of wood that had the exact scale ridges I needed for the 2 sides.


I created an almost perfect replica crank knob by using Apoxy Sculpt to modify a knob I already had.


Using PVC pipe layered with card stock (to build up the diameter of the pipe) and styrene I was able to make the N-filter and Cyclotron rings.


I secured the N-Filter with Apox Sculpt and then glued the cap on.


Using plastic tube I got at the hobby shop I was able to construct a 75% scale Legris elbow replica.


The pillars, Injector tubes, and PPD were made from plastic tubes, PVC and styrene.

I made fake welds on all parts requiring weld details using a plastic syringe filled with silicone calk. Mid way through the drying process I patted the calk down giving it the necessary appearance. I used this process on the N-Filter, Pillars, Injector Tubes, Ion Arm, and HGA.


Next I had to make 75% scale resistors for the Ion Arm. This I was able to do by using Styrene strips, tube, and Apoxy sculpt.


Then it was time to make the Clippard.

Next I moved on to the thrower. I started by making the body using Basewood and 1/4" Styrene which I heated and bent to get the curved top edge.

I added the small details including the weld around where the knob on top goes.


I think that brings me to about here.


The thrower grips were carved out of wood.

I made brass banjos from a brass tube and a square brass rod I found at the hobby shop.

The heat sink I carved and assembled out of basswood strips.


I constructed the trigger box and rear instrument panel from basswood. I designed it so that the trigger box will slip into the instrument bar and can be glues or screwed in from the bottom or back.


The gun ears were made from basswood.

The remaining knobs and hat lights were made with styrene, Appoxy Sculpt, and casting resin.


I constructed V-hooks which will be one side resin and one side Aluminum.

This is the aluminum side.

After all this it was time to start molding. Molding so that I could start making these kits available to the Community! Thats right! One of these could be yours, or your Girl friends, or your kids! But we'll get to that later. Right now lets look at the molding process.
Heres us claying up the buck in preparation of creating the mold jacket.


Now creating the mold jacket.


This is my mold box for the bumper.

And here are all the mold boxes for the remaining parts.

Pouring molds.


Demolding.


Next to a full scale mold.

And the master buck goes on the wall to hang out with some of its big brothers.

Now its time to start glassing shells.


First shell had a defect in the mud coat. It had been under catalyzed.

So we try again.

Beautiful.

A proud new pack owner.


Off to work I go.


And time to start pouring parts.

Heres a nearly complete thrower kit.

Some rubber bands to hold it together and a full scale thrower for reference.

Bumper pulled.
Heres all the finished parts to the kit.
Trigger box assembly.

Gun body.

Hat light caps.
Thower knobs.

Thrower grips.

Gun Track.

Thrower Misc.

Heat Sync.

Clippards.

Hardware.

Booster Frame.

Bellow.

Ribbon cable clamp, buster plug and wire lomb tube.

Ion Arm.


Resistors.

HGA.

Injector Tubs and pillars.

PPD.

Bumper.


And finally a shell

----------------------------
Now I'll start putting one together.
This pack is being built from my first defective shell. I patched it up and it looks great!
The finished pack will be donated to a local kid who is one of the biggest Ghostbusters fans I've met and really deserves a great proton pack.
I apologize for not having a more complete account of the build, but once I get going its hard to stop and think about pictures. But if you've ever read a build thread before its essentially all the same.
I'll try to better document the build of the next kit I put together.
I've replaced the Clippard tube with wire so that I cans still match color with scale. I also am using a 40 pin ribbon cable instead of a 60 Pin. Not quite 75% scale but close enough.

Pic for scale


Decided to get a little fancy for this kids pack and gave it aluminum handles with a rotating barrel and a spring loaded acrylic tip. The kit is designed to fit a standard PVC pipe, so I had to modify the holes with Apoxy Scult to fit the slightly smaller 1" Aluminum piping.

Its such a beauty. I'd never guess it was from a reject shell.

Next to a full finished pack for scale. Still needs some more work, a mother board, and alice frame, but its well on its way.

What did I say about alice frame. I think I went a little mad trying to make this. But it was well worth the effort.


More to come soon. I'll update it again when I get more done.
Again, if you 're interested in buying one of the finished kits, see my For Sale Thread.
I will also show pictures of all the finished parts after they had been molded, so you will get to see all the finished parts.
If you're interested in buying one of the finished kits see my For Sale Thread.
Using a combination of Stefan Otto's plans, measurements off some screen used packs, along with various reference photos and consulting some known pack makers, I scratch built a complete 75% scale pack replicate. This includes Pack Shell, Bumper, and hardware. If its on a proton pack I've made a 75% version of it.
Here are some pictures from the build.
I constructed the buck using almost entirely 1/4" basswood. I cyclotron was made out of pine.
The bumper was build by deconstructing it down to its basic shapes. Using basswood and thin sheets of plywood I got from the craft store, I was able to create sections of the bumper and assemble it piece by piece. Then using bondo I filled the seems and rounded the edges.
Heres an image taken next to a full scale shell for reference of scale.
Later I was able to find an exact 75% scale REAL bellow.
At the hobby shop I was able to find hexagonal brass tube at the exact scale I needed for the Booster frame, as well as strips of wood that had the exact scale ridges I needed for the 2 sides.
I created an almost perfect replica crank knob by using Apoxy Sculpt to modify a knob I already had.
Using PVC pipe layered with card stock (to build up the diameter of the pipe) and styrene I was able to make the N-filter and Cyclotron rings.
I secured the N-Filter with Apox Sculpt and then glued the cap on.
Using plastic tube I got at the hobby shop I was able to construct a 75% scale Legris elbow replica.
The pillars, Injector tubes, and PPD were made from plastic tubes, PVC and styrene.
I made fake welds on all parts requiring weld details using a plastic syringe filled with silicone calk. Mid way through the drying process I patted the calk down giving it the necessary appearance. I used this process on the N-Filter, Pillars, Injector Tubes, Ion Arm, and HGA.
Next I had to make 75% scale resistors for the Ion Arm. This I was able to do by using Styrene strips, tube, and Apoxy sculpt.
Then it was time to make the Clippard.
Next I moved on to the thrower. I started by making the body using Basewood and 1/4" Styrene which I heated and bent to get the curved top edge.
I added the small details including the weld around where the knob on top goes.
I think that brings me to about here.
The thrower grips were carved out of wood.
I made brass banjos from a brass tube and a square brass rod I found at the hobby shop.
The heat sink I carved and assembled out of basswood strips.
I constructed the trigger box and rear instrument panel from basswood. I designed it so that the trigger box will slip into the instrument bar and can be glues or screwed in from the bottom or back.
The gun ears were made from basswood.
The remaining knobs and hat lights were made with styrene, Appoxy Sculpt, and casting resin.
I constructed V-hooks which will be one side resin and one side Aluminum.
This is the aluminum side.
After all this it was time to start molding. Molding so that I could start making these kits available to the Community! Thats right! One of these could be yours, or your Girl friends, or your kids! But we'll get to that later. Right now lets look at the molding process.
Heres us claying up the buck in preparation of creating the mold jacket.
Now creating the mold jacket.
This is my mold box for the bumper.
And here are all the mold boxes for the remaining parts.
Pouring molds.
Demolding.
Next to a full scale mold.
And the master buck goes on the wall to hang out with some of its big brothers.
Now its time to start glassing shells.
First shell had a defect in the mud coat. It had been under catalyzed.
So we try again.
Beautiful.
A proud new pack owner.
Off to work I go.
And time to start pouring parts.
Heres a nearly complete thrower kit.
Some rubber bands to hold it together and a full scale thrower for reference.
Bumper pulled.
Heres all the finished parts to the kit.
Trigger box assembly.
Gun body.
Hat light caps.
Thower knobs.
Thrower grips.
Gun Track.
Thrower Misc.
Heat Sync.
Clippards.
Hardware.
Booster Frame.
Bellow.
Ribbon cable clamp, buster plug and wire lomb tube.
Ion Arm.
Resistors.
HGA.
Injector Tubs and pillars.
PPD.
Bumper.
And finally a shell
----------------------------
Now I'll start putting one together.
This pack is being built from my first defective shell. I patched it up and it looks great!
The finished pack will be donated to a local kid who is one of the biggest Ghostbusters fans I've met and really deserves a great proton pack.
I apologize for not having a more complete account of the build, but once I get going its hard to stop and think about pictures. But if you've ever read a build thread before its essentially all the same.
I'll try to better document the build of the next kit I put together.
I've replaced the Clippard tube with wire so that I cans still match color with scale. I also am using a 40 pin ribbon cable instead of a 60 Pin. Not quite 75% scale but close enough.
Pic for scale
Decided to get a little fancy for this kids pack and gave it aluminum handles with a rotating barrel and a spring loaded acrylic tip. The kit is designed to fit a standard PVC pipe, so I had to modify the holes with Apoxy Scult to fit the slightly smaller 1" Aluminum piping.
Its such a beauty. I'd never guess it was from a reject shell.
Next to a full finished pack for scale. Still needs some more work, a mother board, and alice frame, but its well on its way.
What did I say about alice frame.
More to come soon. I'll update it again when I get more done.
Again, if you 're interested in buying one of the finished kits, see my For Sale Thread.


 - By darthbuster
 - By Indy Magnoli
 - By kahuna900
 - By UncannyGirl