I say just charge everything and get everything you need now. October is a ways away! It's not even my pack and the suspense is killing me lol. I keep debating building my own pack but it definitely is an investment. I'm living vicariously through you just so you know. Looking forward to seeing this thing built!
Nah, I couldn't do that, my fear of putting such a large hole in my credit card is helping me learn some patience, is giving me time to plan, and not to mention, gives me time to concentrate on priorities right now with the family and work... In reality, it's not too far from now, just a couple more weeks... It feels like only a couple days ago when I said "4 more months to go," and now I'm down to almost half of that...
Also, with Vincent in the middle of his move right now, by the time October rolls along, he will have a larger inventory of parts, and maybe even some new products that I can purchase from him in one fell swoop! Me needs some goggles! LOL!
I will be honest and say this, however... This is my very first major prop building project (not to count that poster board belt gizmo I made for my wife), and I'm afraid that my impatience will get the best of me once I have all the parts and I will slap this together quicker than I need to and make more mistakes than I need to... that will be a challenge all in itself... I think making sure that I document everything I do will help me ensure that I take my time with every piece and making sure that I'm installing everything carefully... and everybody here will put me in my place if I start straying... LOL!
This post may contain an affiliate link that helps support GBFans.com when you make a purchase at no additional cost to you.
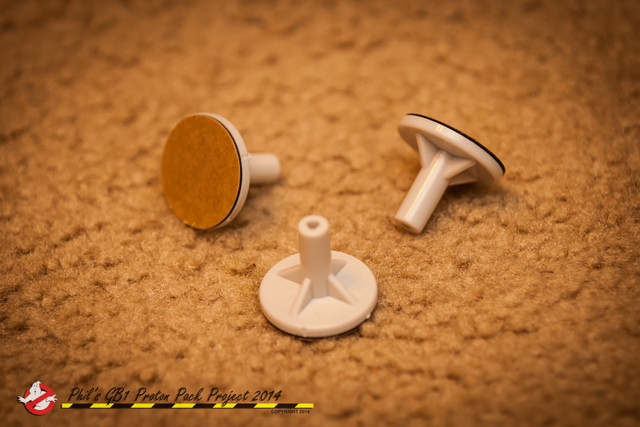
Alright, got some new stuff...
First of all, thanks to Cadger for supplying me some of these, they will come in handy! Thanks, bro!
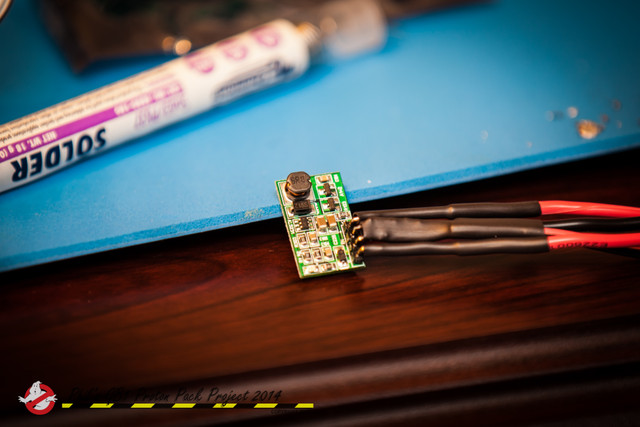
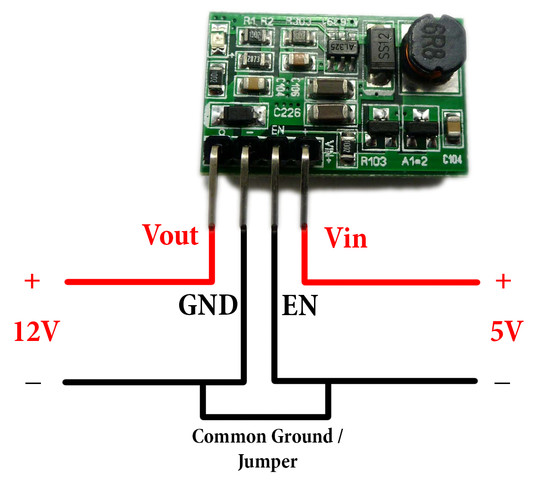
Second of all, got these little wonders, as suggested to me by Doug, to work with the GBFans Wand Lights Kit to boost the 5V AUX Output to 12V in order to support a 12V LED bulb... Thanks, Doug!
And then possibly the worst solder job I have ever done... if only I had the right equipment to hold it steady... Anywho, good enough for testing, and I was able to hide it behind some heat shrink... The two center leads are a common ground for the purpose we are using it for (documentation can be found on the eBay listing above)... I will most likely use a smaller gauge of wire for my final build, as these were too thick...
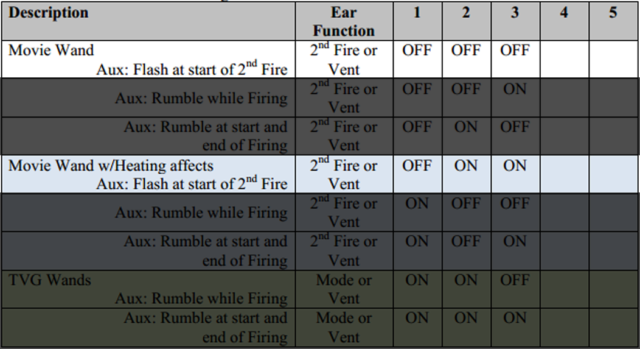
And... VIDEO!!! Not sure which setting I'm happy with (I'm utilizing the "rumble" feature to light the bulb in the other two settings)... It's definitely not perfect, but it friggin' works!!! Bwahahaha! Somehow, it still doesn't seem to be enough juice to pop an actual flash bulb, though... I wonder why... testing will continue... Any thoughts or suggestions are welcome!
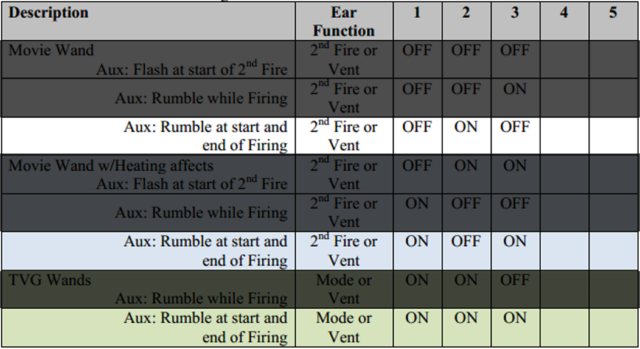
And for those who can't see the Wand Light Kit DIP switch settings in the video, here they are... Setting #1:
Hey would you mind drawing out the schematics on how you wired that 12v boost chip? I bought one of those when I was originally trying to install the LED stick (from the e cig vent) for my gun vent but couldn't seem to get it right.
The actual flash bulb is definitely brighter... I was able to pop one with a 9V, but for some reason it won't pop with this set up... maybe it's the current that is lacking for the flash bulb, not necessarily the voltage... At least it works with the LED, and that makes me happy!
ovwthrillseekr wrote:Hey would you mind drawing out the schematics on how you wired that 12v boost chip? I bought one of those when I was originally trying to install the LED stick (from the e cig vent) for my gun vent but couldn't seem to get it right.
I'll get to it tomorrow, gots to get some sleep before another long day at work tomorrow, but I'll definitely get it for you!
ovwthrillseekr wrote:Hey would you mind drawing out the schematics on how you wired that 12v boost chip? I bought one of those when I was originally trying to install the LED stick (from the e cig vent) for my gun vent but couldn't seem to get it right.
Here you go, buddy! Hopefully, it makes sense to you... For the purpose we are using it for, you only need to short/jumper/connect the two center pins together in some way... that's up to you on how you want to do it... I'm sure somebody can figure out a more unique way to us those two center pins as some kind of switching mechanism for something...
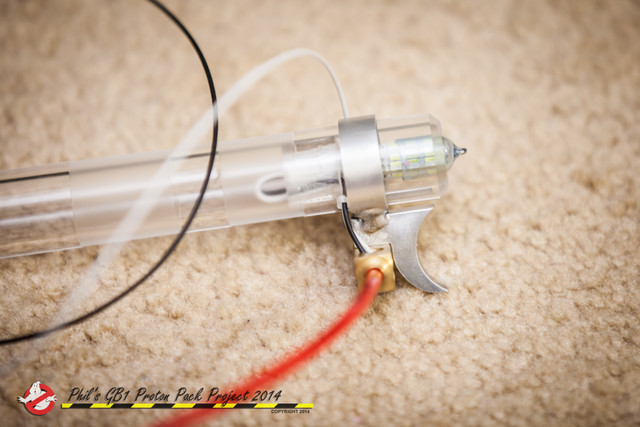
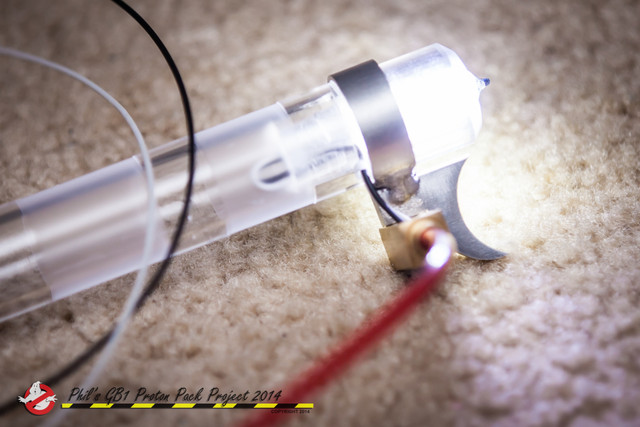
Both Vincenzo and Julz helped me out with the length of the red hose, primarily referring me to the GB1 movie poster and trying to eyeball it... did my best, and I think I'm good... either way, I'm more in the region of it being a little longer than short, so if I need to shorten it later, I can easily do that... But until I have a gun kit, I won't be completely sure...
Anywho, just a couple of photos of my progress... should be ready to install once I get a gun kit...
pyhasanon wrote:LOL! That means a lot to me, thanks!
Nah, I couldn't do that, my fear of putting such a large hole in my credit card is helping me learn some patience, is giving me time to plan, and not to mention, gives me time to concentrate on priorities right now with the family and work... In reality, it's not too far from now, just a couple more weeks... It feels like only a couple days ago when I said "4 more months to go," and now I'm down to almost half of that...
Also, with Vincent in the middle of his move right now, by the time October rolls along, he will have a larger inventory of parts, and maybe even some new products that I can purchase from him in one fell swoop! Me needs some goggles! LOL!
So, I posted this back in July... and guess what? IT'S ALMOST OCTOBER!!! Big updates coming soon!!!
Question, everybody... Snooping around to see what else I may be missing, and I figured I would need a bunch of screws and stuff... And, going through the Stickied Proton Pack Index thread, I found this...
janderson0719 wrote:I put this list together because I've recently been gathering certain information, and ran into all the following screw sizes on different threads, so I decided to make it all available in one place. The following is what I found, but if anyone wants to revise something, by all means, go ahead.
GB1 Pack:
1/4-20 socket cap screw - shell to mobo, HGA.
10-32 socket cap screw - booster frame, ion arm end cap, bumper.
8-32 socket cap screw - ribbon cable clamp, clippard 331 valve(some hero packs may had 10-32).
4-40 socket cap screw - resistors on ion arm.
GB1 Thrower:
10-32(not sure of size) slotted fillister head - clippard 701 valve
8-32 socket cap screw - gun track discs, base plate of gun box(possibly some throwers), screw in between side gun discs.
6-32 socket cap screw - rear bar instrument, front handle base, base plate of gun box(some throwers), barrel lock.
6-32 flat socket cap - V-hook on gun track
4-40 socket cap screw - top knob, heat sink (screw in from inside gun box)
Does this still stand as the end all list for screw sizes and locations, or have new details been discovered that I may have missed and this list just not been updated...?
I used it as well. I'm making a Fastenal run on Monday. Let me know if you want anything. Things you need from fastenal are screws in the 6-32 range. Lowes only carries down to 8-32. I also might have a bunch of extras lying around from my build. I'll try and do an inventory this weekend.
Oh good! Someone else that uses Fastenal! I'm in the process of gathering info for my GB2 semi-hero. Fastenal was literally the only site that has EVERY screw needed.
Yeah, I found a Fastenal much closer to me, so I'm gonna try to hit them up next week and do a hardware run! Thanks all! This will be an exciting and busy month!