User avatar
By Gozerhead
#4877125
My goal is to build a "good enough" stunt pack for wear a couple of times a year around Halloween. I started a year ago and am about to pick it up again.

I decided to go with a basic cardboard build. I started the basic pieces and amy moving to the bottom half of the shell ASAP. Right now, I have the cost of one piece of MDF invested. I already had the tape and cardboard. I took a hodge podge of ideas from all over this forum. I snapped a quick pick of my initial progress, several hours in. I realize the arm is backwards.

Image

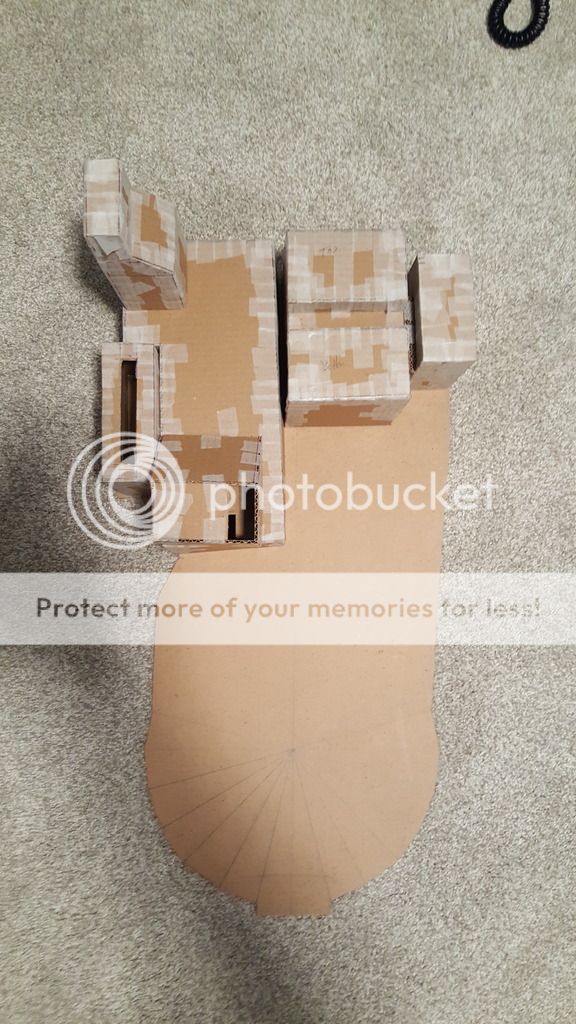
Nothing is attached, hence the gaps, etc. My next step is to trace the generator and grab a pan for the cyclotron. Rather than make a shell to attach to the motherboard, I plan on mounting direct (with the exception of the cyclotron being removable).

Since the cardboard and tape have sat, I am sure I will have touch ups. I think I can utilize some Bondo and hot glue to clean things up. Initially, I was going to reinforce each piece, attach to the motherboard, and then fill in/sand the joints.

My hope is by Halloween of 2016 it can be worn and recognizable. I don't think I will have everything done, but enough to make one time use of it. Any advice, short cuts, or things to consider is appreciated.
User avatar
By Gozerhead
#4878902
I made some progress with the generator. I had some poster board, and might regret using it for the top and bottom as I go? I am trying to figure out how to resin and fiberglass as I am almost to that point.

Image

Image

Image

Image

Next, I need to cut out a hole in the generator top if I want to get in there with lights or sound. I also am going to trace the motherboard onto poster paper to keep a template. I also need some PVC pipe. I ran out of good cardboard and will try and get the spacers done asap.

At that point, I can glue the shell together and resin/fiberglass. If I get that done and manage to fill and sand, I can prime and paint. I might stop there for Halloween and complete the pack this summer.

I did get an Alice frame ordered!!!
User avatar
By Gozerhead
#4879989
Image
So a little progress...I received my ALICE pack!

I also used posterboard to trace my motherboard in order to build templates for the spacers. My measurements aren't exact, but they fit. I am settling on 80% visually accurate with it looking "good enough".

After reading up some on other cosplay boards, I had read multiple times that card stock or poster board can be resined and fiberglassed with good results. I am really stressing about that step. I made one spacer with posterboard last night and kept an extra template in the event it doesn't turn out when I resin.

Besides the stress of fiberglassing, I am having to decide on whether to make a shell and mount with L brackets, or mount right to the motherboard. While I would prefer to mount direct, which will let me use Bondo on the corners and not do as much drilling, I would have to find an idiot proof way to make the power cell and cyclotron accessible in the event I have lights. I am also not sure the power cell will sit perfect against the motherboard as it seems to over hang a bit on the bottom.

Not sure how to proceed, but am hoping to reinforce all my interior edges with hot glue as I am done with the initial shell parts. I am also hoping to practice applying resin to throw away pieces this weekend. Finally, I think I can get the shell glued together and make a final call on it if will sit flush with the board.

In my head, I think maybe I can temporarily cover the motherboard with wax paper and add Bondo to sit flush after I fiberglass?
Image
Image
User avatar
By Gozerhead
#4883002
Finally got around to trying to fiberglass. Other than having to figure out how to clean up the now hard errant strands, the result has been positive. Dr. Gilbert also stopped by with a treat this week!

Image

Image

Last night, I got the motherboard mounted to the Alice Frame. Tonight I hope to cut spacers and pick up some rough grit sand paper (and mask) so I can sand the edges. My plan then is to mount using wood blocks and not L brackets. If I can get that far this weekend, I am pretty sure I can finish the outside resin too.

Next week, my goal is to finish the cyclotron and to use foam core for the edges. A week from now, I hope I am priming and painting!
User avatar
By Gozerhead
#4883364
Spacers are done and the motherboard is successfully mountable.

Image

I then managed to resin the top of the shell.

Image

I am pretty happy with the durability of the paper/cardboard now that it is fiberglassed and resined. I am going to mount wood blocks to attach to the motherboard. I am noticing that my spacing is now a little off. Meaning, I will have gaps between the shell and motherboard. I am still toying with the idea of eventually gluing it together, mostly to fill in gaps. I can do that later, though.

I did manage to get some MDF to do the cyclotron spacers. I printed plans to scale to place the cyclotron holes. I also got a couple of 9"cake tins. I *think* I have tin snips somewhere? I might cut out the hole for the filter rather than trying to cut a filter to fit. I also have enough materials to do a basic gun.
User avatar
By Gozerhead
#4883508
Well, my PPD was way off in size, so I have to redo that. While I haven't resined the ion arm, that is still useable. I ran out of hardner, so all I got done last night was the cutting of spacer for around the cyclotron.

Image

I cut pieces and wood glued them for the #6 and #9, so they aren't pictured. I haven't attached any at this point. While I found a great pan for the top, I am hoping to cut a whole for the filter still - rather than cutting a filter to fit.
User avatar
By Gozerhead
#4884162
So, I am hoping to have the shell done and painted for this weekend, knowing it is useable but not done for Halloween. I got a lot done this weekend, learned that I screwed a lot up, and am already wanting to do a better one...

Image

I don't like the plates on the cyclotron and how that turned out. I also should have done a better job making sure it was a better fit to the motherboard (in this pick, it isn't aligned, so it fits better than what the pic shows...I just don't sit perfectly), and that I had the box with the wand attachment positioned correctly. I looked at too many reference pics without keeping one specific in mind. I also should have thought out the wand hose attachment better.

I did manage to get some L brackets from Home Depot and get them placed. You can't see that totally in this pic, but I can mount to the motherboard now. My PPD ended up not working out, so I have to build a new one tonight. I also then have to figure out how to cut it for the pipe.

If I can get that done, then I can fiberglass and resin it as well as the ion arm. Then I will do a second coat of resin. At that point, I will be done sans prime and paint. I will be trying to throw a wand together via a cardboard box and pvc. I won't have time to detail or complete. I might not even resin it...and I probably won't have a permanent V hook. Not sure what I am going to do about that...

If I were to do it all again, I would have gone styrene and bought some better tools for fabrication. I would then have done a better wood motherboard. I would then save for resin parts to complete the pack.
User avatar
By Gozerhead
#4884253
Every time I add something, I find more mistakes, lol...

Image

The PPD looks cleaner in real life. The one tube is turned too far in now, but already glued in place. The ion arm isn't pictured as I set it aside to fiberglass. I had to make the PPD and although it is proportional, I had some set backs. I was hoping to finish a second coat of resin on the outer shell AND to cut a template for the wand box, but got neither done.

I pretty much have tonight to finish fabrication so I can have it painted by Friday. I have come to terms with having to fix stuff after Halloween, which will probably included additional fiberglassing and repainting before adding the rest of the details like tubes and ribbons.

If there is a super easy and cheap (or better yet, 1:1 template for a wand box) way to do a temporary wand/thrower, I am all ears. My current plan is to draw the template and add two pieces of pvc. I probably won't even resin it or add additional detail.
User avatar
By xyster101
#4884293
The wand is a pain but it is easier then the pack. Some pvc and a cardboard box and you can whip together a make shift one quick. Attaching it to the pack is a pain.
User avatar
By Gozerhead
#4884794
Well, it is the big day. This is what I got done.

Image

The thrower is a temporary throw away. It is painted foam core and filler. I didn't even resin it. I did add a face to the ion arm and inserted brass rodding that I already had. I think it is smaller than the real stuff, but good enough. I didn't have a good sided bit to have the bolts flush, but it is "good enough". I did the texturing with orange peel I had left over. I did this to cover up mistakes, but it looks too heavy, IMO.

I tried L brackets and screws to mount. I found a YouTube where someone epokyed the screws so that they could bolt to the motherboard. I tried this, didn't like the results, and drilled a second hole at each mounting point. I then used zip ties to attach. It worked MUCH MUCH better and cost me nothing but 5 minutes. It was a mistake to use MDF for the motherboard, but it is sturdy enough. I am ok with the red lenses, but the blue one is horrible. It will work for tonight, but I need something heavier and easier to mount well.

The thrower is the right dimensions, but I used left over foam from the alice pack for temporary grips. My plan is to redo it over the winter and make a decent wand from a resin kit. At this point, with the pack, I am finishing everything on the cheap and doing "good enough". I don't cosplay hardly at all, and really only need it for future Halloween type stuff.

This has been fantastic for learning the ins and outs of the pack and what to do/not to do. The alice pack and resin are the most expensive parts of the projects. Otherwise, it was a few bucks here or there for everything other than the cardboard, which was free. I am guessing I have less than $175 into this project. The frame was $40 and the resin was about another $30. Otherwise, the most expensive piece was the MDF. I don't think anything else I purchased this exceeded even $10. The texture would have been $15, but I already had it on hand.
User avatar
By Gozerhead
#4884795
One thing I could use help with - I want to get easy to find/cheap hardware pieces for attaching tubes. I couldn't find a comprehensive post of readily found pieces. Thanks!!!!

    The amount of people participating in the milest[…]

    This is awesome, One time. I love reading explanat[…]

    And, lastly, for now, the video that prompted me t[…]

    At some point, probably just better off opening up[…]