By jt001
#167524
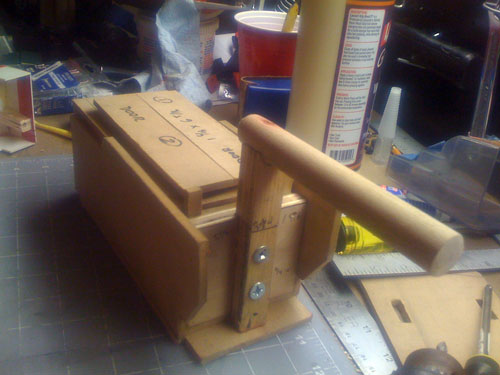
Well, I'm done with my stunt trap and holster. I used different sources to build my trap: Venkman 71, SG1Stargate and Hprops for the labels, along with references from fellow members who were a great help and were kind enough to provide me ref pics of their builds. Most of the measurements I got from Venkman's 71 Project Plans. In a nutshell, I took most of his plans and basically drew themin Illustrator in real size, used them as templates and printed them in cardboard. Once the cutting was done, I traced everything in MDF and/or styrene and build everything up.

I have all the templates in one PDF file, including plans for the holster. This community has supplied endless info to me, and I'd just like to give something back. Although, as mentioned earlier, I can't take credit for all of these. That belongs to Sean, SG1Stargate and HProps, and a few friends from the board who provided awesome ref pics. What I can offer is just the templates based on Sean's plans, so all you have to to do is print them in and 8.5x11 standard paper/cardboard and trace them over whatever you want to make your trap of.

Would there be any interest in this? If so, I could upload the plans to my site and provide the link for downloading the templates. The plans will of course give credit to those responsible in the first place.

Please also keep in mind that I modified some stuff because I intended to build a stunt trap in the first place. If you want to build a trap with working doors, you will need to make the necessary adjustments, but at least you have something to help you out with the whole process. Templates do not include knobs nor the "ears" that go at both sides of the front panel indicator. My knobs and ears were supplied by Nick-a-tron, and I'd highly recommend for you guys to do the same. His knobs and ears are top notch.

I'm almost done with version 1.0 of the templates. So if there's any interest, I can post a link when I'm done with this first revision. If so I'd also appreciate some feedback if you notice a wrong measure or anything that I might just missed in the process.

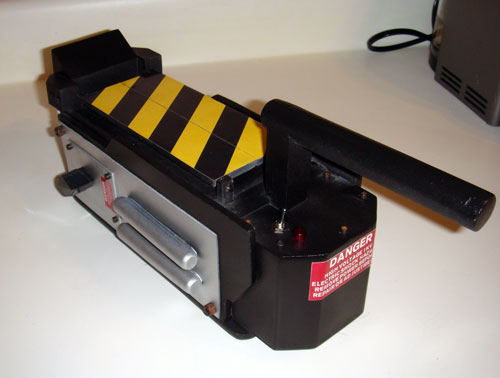
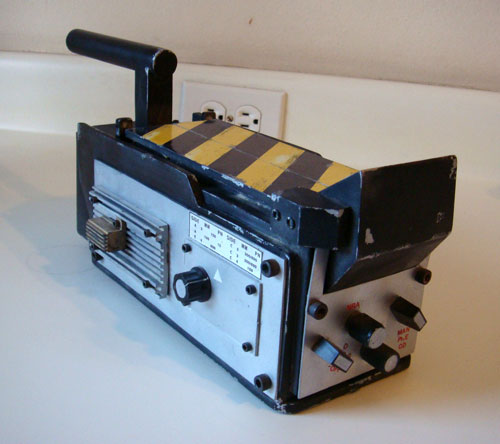
Here are some pics of how my trap and holster came out:

Image

Image

Image

Image

Image

Image

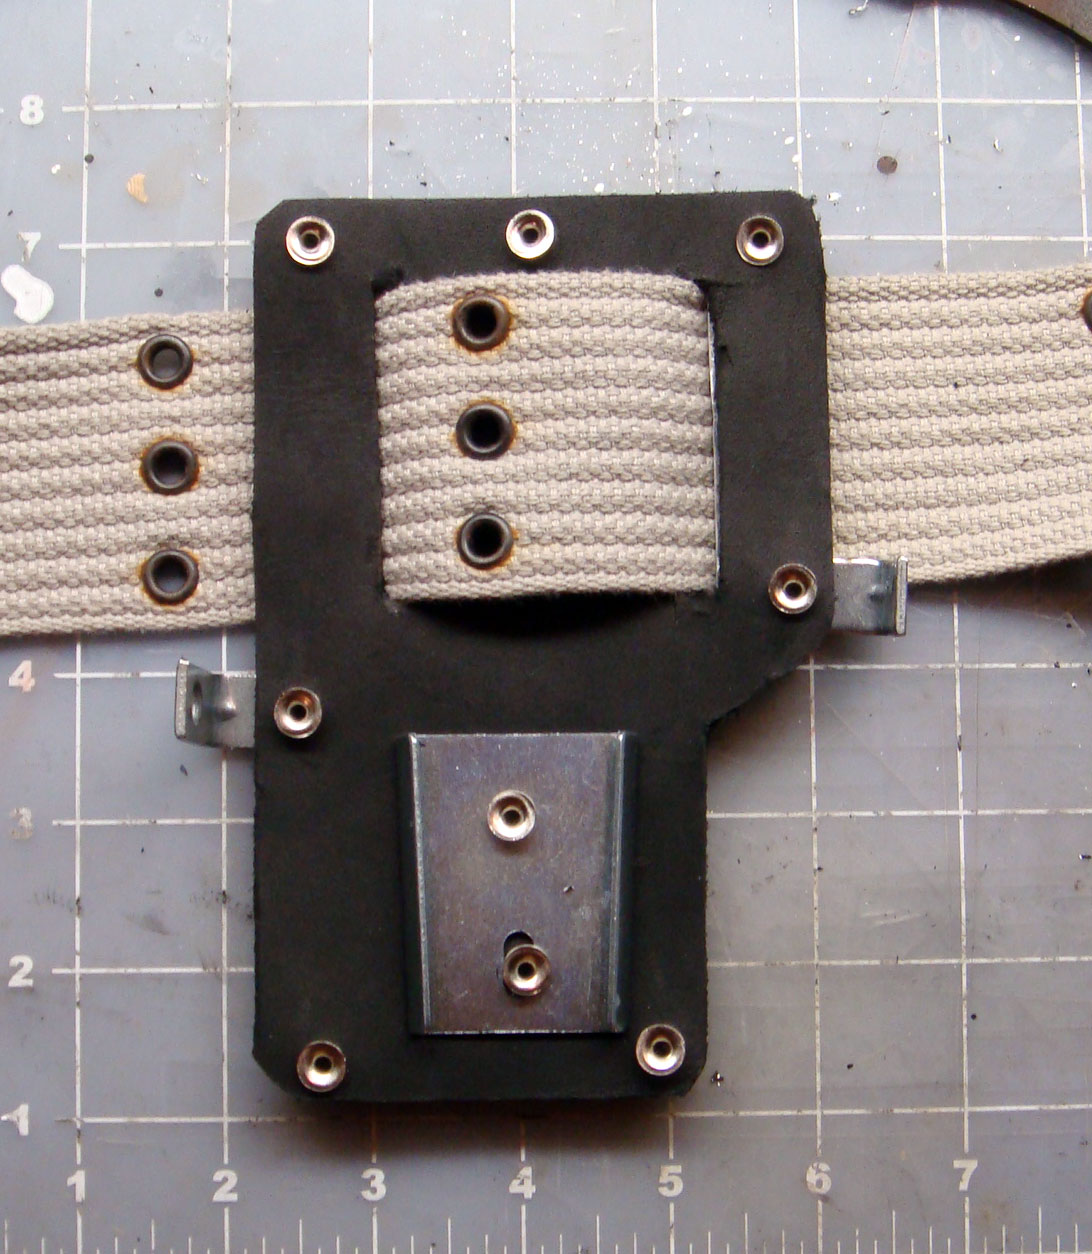
Rivets were just for position only:

Image
Last edited by jt001 on September 28th, 2009, 7:45 pm, edited 1 time in total.
Nik842, Dougger liked this
#167678
I've seen these, and they are VERY nice.

I'm eaffling between making one from wood/foam core or plexiglass.. I found out that you can buy scrap plexi from lowe's for almost nothing. I got enough for 2 traps for $2 yesterday!
#167681
BTW, do you need some special leather tool to add rivets to leather?
#167731
Thanks Gareee! I appreciate your kind words! :)

For the rivets: you can get it done with a center and a hammer. Just make sure the center punch is a bit bigger, so it doesn't go all the way in through the rivet when you hit it.

I'll be providing the link as soon as possible! If you notice something that should be fixed, please let me know!!!
#167739
Actually, just did.. your v hook image on the holder is actually upside down. I just happened to be looking at the high res pics that showed that a few minutes ago.
#167747
Image

There's the high res shot. Everything else looks spot on.
#167816
For parts we are considering:

wood for the base, and handle
wood dowel for the actual handle

main body either sheet styrene, plexiglass or wood

front box sheet styrene

rollerblade bearings for wheels, with pencil cuts for axels

possibly insulation foam for the back angled shape, with wood a wood block mounted in it for the top flashing light, and the cable connect in the back

top doors will either be styrene, or plexi, and the aluminum side plates will all be plexi, painted silver to look like aluminum

We are considering starting the builds tomorrow. One option we are considering, is making the trap under the doors hollw, to accomodate small repair items, to the trap can actually serve as an accessory, plus a storage compartment. My Pockets were always stuffed at dragoncon, and that space would have come in handy.

If we do that, we'll have to modify the plans and builds accordingly.

Marci can use it as a trap purse.. LOL!
#167822
Yep.. check at lowes though for scrap plexiglass.. its sturdy, east to cut, and has no grain like wood. Its great painted to simulate metal.

I got about $20 worth yesterday for $3!

It also comes in a few different thicknesses asa well.

Worst case, overbuy, and return what you don't use. I'm planning on gorilla glue on inside joints for strength, and screw to mount the handle solidly to the base. We saw a guy's trap hit the ground and shatter during the dragoncon parade.. I'd like to reduce that possibiloty as much as possible.
#167831
TurboTrey03 wrote:wow thanks!

just wondering what was your "parts list" as far as the materials you used? thanks again.
You are welcome!

I didn't include a list of materials because that will depend greatly on your budget. In my case, I needed to spend as little as possible. Don't forget to check my trap building thread. I also have some resourceful info over there! http://www.gbfans.com/community/viewtop ... =3&t=14854

Here's a list of the things I used, more or less.

1. MDF (medium density fiberboard)
For most of the trap I used MDF as my main building material

2. Wood filler
This will help you get rid of the wood grain. This is important if you want your trap to look like it's made of metal parts. Wood looks beautiful in furniture, but not on "highly sophisticated equipment" ;) hehehe

3. PVC "For Sale" sign.
For 8 bucks I found at Home Depot a HUGE PVC sign. It's more sturdy than the regular styrene sign. I used this to build the battery compartment and the front display indicator. If you look at the finished parts, you'l never be able to tell they were made from a PVC sign. I also used it to build some parts of my belt gizmo, and still have a lot left for future projects!

4. Epoxy putty
This is great for filling your PVC/styrene pieces. Once you fill all the gaps, use some sanding paper. The piece will look like if it was made in one piece, not small different pieces glued together. A useful trick I use is to close my eyes and "feel" the piece once the sanding has been done. If you feel bumps, holes or uneven parts, go ahead and either sand or use more filler until you get it very smooth. Use a finer grid paper to achieve a smoother finish!

5. Stanley blade and X-Acto knife
Use the back side of the Stanley knife to do your scoring and finish it with your Stanley or X-Acto knife, but don't cut the part, just score it. Then move it up and down until the part snaps. You'll get a more cleaner cut that way. Finish it with some light sanding.

6. Super glue (for styrene/PVC) and Wood Glue (I used the yellow one)
The great thing about these glues is that, contrary to epoxies, these puppies dry ultra fast! That means you can get much more work done in less time! Both glues dry in about 15 minutes.

7. Mask (if you are using MDF)
Don't underestimate this. MDF gets everywhere and it can be very dangerous

8. Jigsaw blade with fine (lots of teeth) blade
For smoother cuts make sure to get a blade with lots of tiny teeth. The more teeth it has, the smoother the cut.

9. Wood clamp
I could've never get this thing done without it!!! Since I was on a tight budget, I could only afford to get one, but at least for me, this was completely necessary!

10. Wood chisel
This will be very useful to make the back wall channel

11. Misc items
Metal ruler, sharpie, pencils, primer, paint, silver paint (for drybrushing), metallic color pen (easy paint chips).

Hope that helps! :)
#167832
Gareee wrote:
We are considering starting the builds tomorrow. One option we are considering, is making the trap under the doors hollw, to accomodate small repair items, to the trap can actually serve as an accessory, plus a storage compartment. My Pockets were always stuffed at dragoncon, and that space would have come in handy.

Marci can use it as a trap purse.. LOL!
That is a GREAT idea!!!
#167969
VERY nice & VERY good to have! I just finished with my trap last night but I'll be using this for my next one, no question! The trap holster template is somthing I've been looking for now that I have my trap done, that'l come in VERY handy, plus I'll probably put one more small "Danger" decal top of the battery box to the right side.

¡Gracias Jose!
#168016
AJ Quick wrote:Great job!

We should get these up in the Plans section.
Thanks AJ! That would be great if you do it. I appreciate it :)

Elsolado: De nada! :) I'm glad you liked them, bro! (I felt like Dora the Explorer talking in Spanglish! LOL)

Garvin: Yep, they should be good to go! Parts are based on existing plans. As a matter of fact, take my templates as a companion to the existing plans, and always make sure to compare the parts for reference, just in case!
Ecto Containment Unit

First off awesome work!!! second of all where did […]

https://i.imgur.com/cMwtW9y.jpg Where do th[…]

Greetings from Montana

Hey and welcome

The amount of people participating in the milest[…]