- September 21st, 2014, 3:07 pm#4810572
Hello! I've slowly been building bits and bobs for the last month or so, but never quite find the time to post anything ... I'm going to try to make time though.
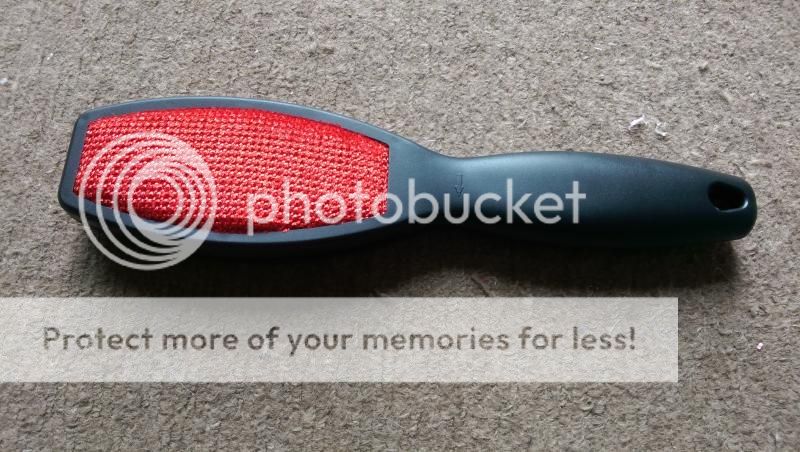
First up, a PKE Meter. Sticking with my ethos of making stuff cheaply out of things I can point at and go "this used to be a ..." (and after finding out how much the Matty ones go for - eek!) I opted to copy the many, many others on this site and build a a meter out of a lint brush.
I chose one of these as opposed to the skinny handle variety because I wanted to fit batteries to it.
I mean, come on - I want it to sort of work at least.
The wings I made out of foam core (which allowed me to just push the LED legs through it) sandwiched between two bits cut out of a DVD case using the HPPROPS templates. I knew I'd never be able to get the lights flashing in sequence, let alone increasing in speed, but figured I could fake it by using flashing LEDs on two circuits. Lights 2, 4 and 6 would light up when the wings were at half-mast with 1, 3, 5 and 7 lighting up when they were fully extended.
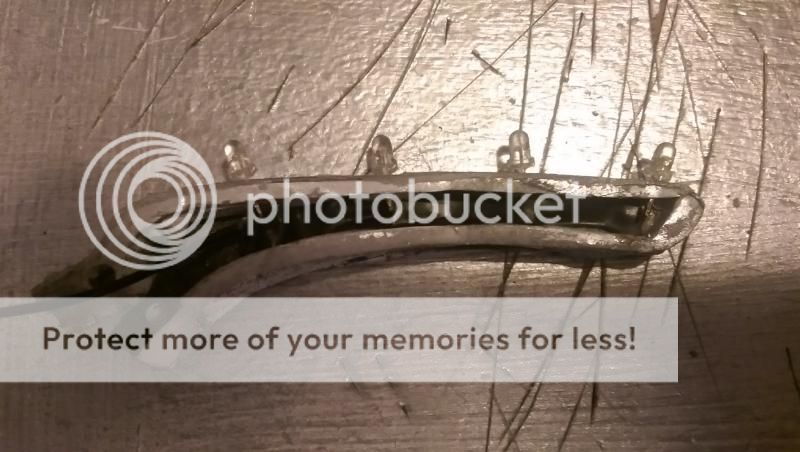
After a lot of this:
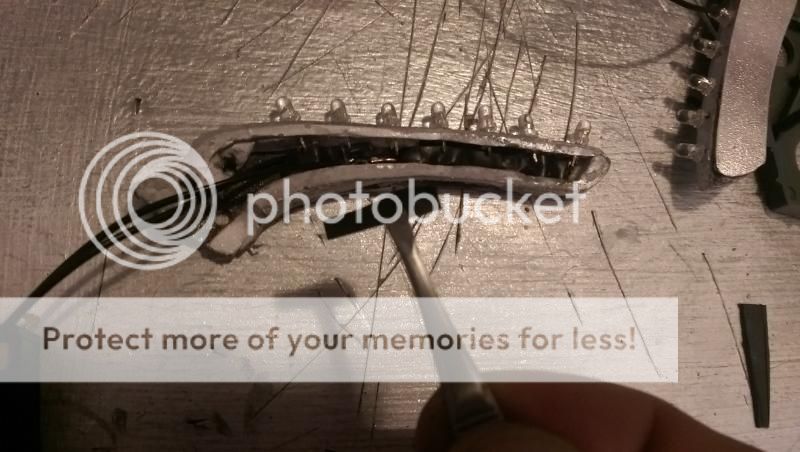
And a bit of this:
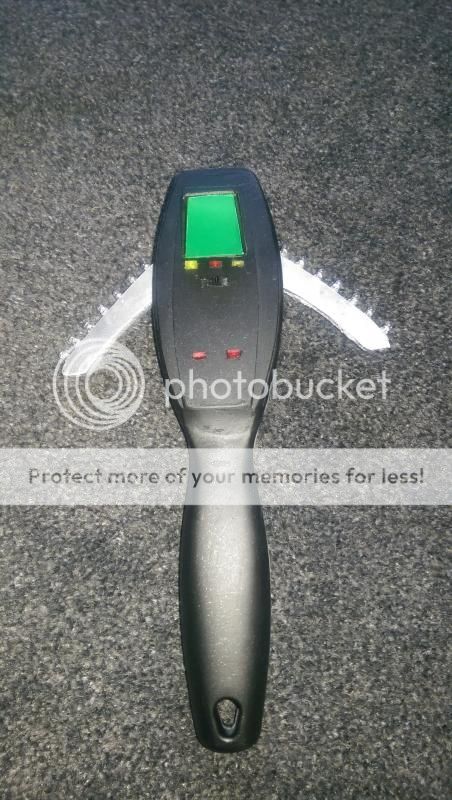
I had it working pretty much as planned.
Hooray! This is going to be easy!
Yeah ... right.
First problem was discovering the face plates I'd painstakingly cut out of DVD cases wouldn't glue to anything.
Anything.
At all.
I was left with a nice looking pile of useless plastic. A quick Google later, a better understanding of Polypropylene and some All Plastics Superglue and I had this:
Which kind of looks the part, right?
The silver speckles were an accident - I was spraying the wings too close to the drying body on a windy day. Never mind, I kind of like it.
The screen was cut from a plastic tub lid (I think it originally had Christmas lights in it). The rectangular LEDs (I know there should be a green one - but it was cheaper not to!) had to be ground down with a Dremel (actually an unbranded alternative) to get them to fit - there's not a lot of room in there! Behind the screen I've put four flashing white LEDs behind two rows of holes in a piece of black DVD case to make the screen patterns.
At this point it all got really frustratingly difficult and I forgot to take any pictures.
The plan was to have lights 2, 4 and 6 turn on with the power on switch (which I've located to the right hand side so it can be operated by my thumb) and lights 1, 3, 5 and 7 turn on automatically when the wings are fully opened. I briefly toyed with using a motor from an old PC DVD drive to open the wings ... but there wasn't enough space.
Plan b was a slide mechanism with fixed bars cut from a coat hanger ... which took a lot of fiddling to get it to work - seriously, there's no space in there. The best I could get it working in the end still takes a LOT of thumb pressure. It's actually painful to do. I originally had elastic bands to pull the wings closed ... but they made the slider even harder to open, so I took them out . The wings can be partially closed with the slider, the last bit has to be done by hand.
I couldn't get the mechanism to turn on the second set of lights either, so I figured I'd use the same method as the screen prop with my thumb bridging contacts - but couldn't figure out how to do that and open the wings with the same thumb.
Next up, I tried drilling holes in the left hand side of the handle and using my forefinger to bridge the contacts ...
Which didn't work either. I guess you need more than 2 x AAA batteries to conduct across a finger?
By this point, with all the fiddling, poking, assembling and disassembling I'd somehow managed to short circuit the left wing lights so they all came on no matter what I did.
Oh well.
All of them on at once it is. Luckily all the LEDs flash at different rates so they kind of look like they're chasing each other. If you squint.
All that was left was to make the screen-pattern-select switch and glue it permanently in place upside down (doh!), grind down the wing LEDs to give them a square top, weather it with silver paint and this was the result:
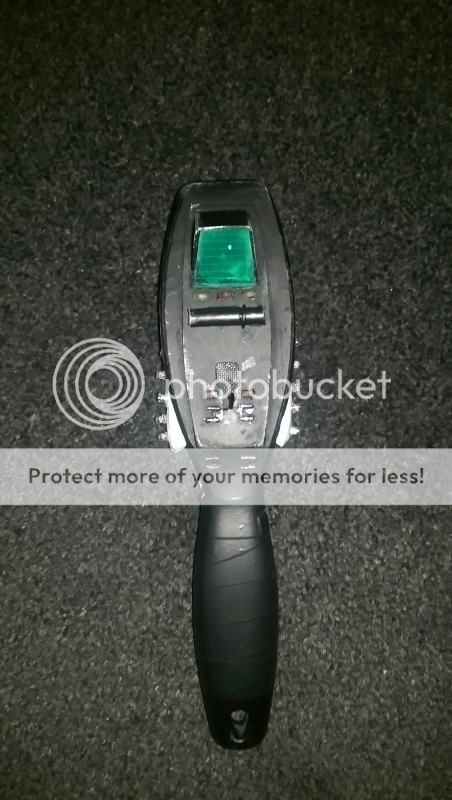
And with the wings up:
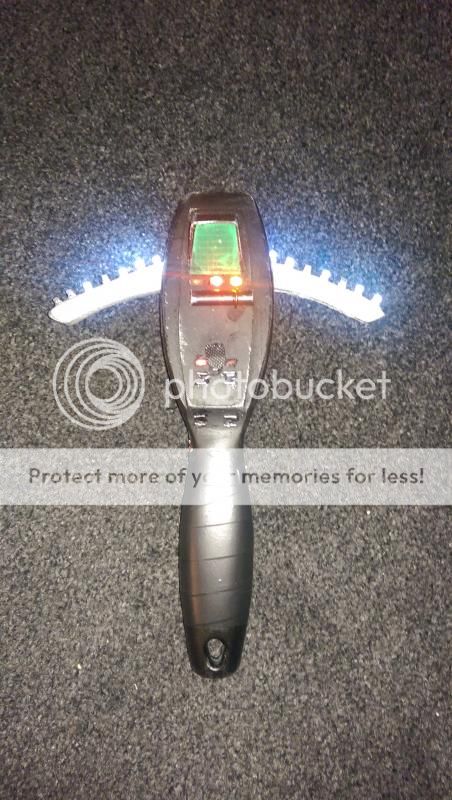
... which completely fails to show off any of the screen lights. Never mind, here's a video of it in action:
There are seven ribs fitted to the back, but I forgot to turn it round to show them off.
Total cost of this build was probably about £6 ($10-ish) - excluding foam core and DVD cases I already had and things like glue, solder and wire.
A thousand thank yous to all who trod this road before me.
If I was going to do this again, I'd make damn sure I insulate the LEDs in the wings properly and build up the body more so it was closer to the screen prop and not so flat - that would also give me more space to fit a motor. I'd also make my own wing templates so they more closely fitted the brush curves and actually fit flush to the body when closed. I think I'd try to sink the LEDs into the wings too. I also (probably) wouldn't tape up the handle - I'm not sure why I did that other than by the time I'd finished assembling and disassembling it the damned thing wouldn't close properly. It kind of annoys me, but also kind of suits the battered look.
The hole in the handle I was going to fill in ... but I've decided to fit a ring to it instead so I can hang it from a belt fob instead of building a holster.
I know to you guys it will look nothing like the movie prop, but to anyone I'm likely to meet on Halloween it will be close enough (in the dark) for no one to notice.
Hopefully? What do you think?
First up, a PKE Meter. Sticking with my ethos of making stuff cheaply out of things I can point at and go "this used to be a ..." (and after finding out how much the Matty ones go for - eek!) I opted to copy the many, many others on this site and build a a meter out of a lint brush.
I chose one of these as opposed to the skinny handle variety because I wanted to fit batteries to it.

I mean, come on - I want it to sort of work at least.
The wings I made out of foam core (which allowed me to just push the LED legs through it) sandwiched between two bits cut out of a DVD case using the HPPROPS templates. I knew I'd never be able to get the lights flashing in sequence, let alone increasing in speed, but figured I could fake it by using flashing LEDs on two circuits. Lights 2, 4 and 6 would light up when the wings were at half-mast with 1, 3, 5 and 7 lighting up when they were fully extended.
After a lot of this:

And a bit of this:

I had it working pretty much as planned.
Hooray! This is going to be easy!
Yeah ... right.
First problem was discovering the face plates I'd painstakingly cut out of DVD cases wouldn't glue to anything.
Anything.
At all.
I was left with a nice looking pile of useless plastic. A quick Google later, a better understanding of Polypropylene and some All Plastics Superglue and I had this:

Which kind of looks the part, right?
The silver speckles were an accident - I was spraying the wings too close to the drying body on a windy day. Never mind, I kind of like it.
The screen was cut from a plastic tub lid (I think it originally had Christmas lights in it). The rectangular LEDs (I know there should be a green one - but it was cheaper not to!) had to be ground down with a Dremel (actually an unbranded alternative) to get them to fit - there's not a lot of room in there! Behind the screen I've put four flashing white LEDs behind two rows of holes in a piece of black DVD case to make the screen patterns.
At this point it all got really frustratingly difficult and I forgot to take any pictures.
The plan was to have lights 2, 4 and 6 turn on with the power on switch (which I've located to the right hand side so it can be operated by my thumb) and lights 1, 3, 5 and 7 turn on automatically when the wings are fully opened. I briefly toyed with using a motor from an old PC DVD drive to open the wings ... but there wasn't enough space.
Plan b was a slide mechanism with fixed bars cut from a coat hanger ... which took a lot of fiddling to get it to work - seriously, there's no space in there. The best I could get it working in the end still takes a LOT of thumb pressure. It's actually painful to do. I originally had elastic bands to pull the wings closed ... but they made the slider even harder to open, so I took them out . The wings can be partially closed with the slider, the last bit has to be done by hand.
I couldn't get the mechanism to turn on the second set of lights either, so I figured I'd use the same method as the screen prop with my thumb bridging contacts - but couldn't figure out how to do that and open the wings with the same thumb.
Next up, I tried drilling holes in the left hand side of the handle and using my forefinger to bridge the contacts ...
Which didn't work either. I guess you need more than 2 x AAA batteries to conduct across a finger?
By this point, with all the fiddling, poking, assembling and disassembling I'd somehow managed to short circuit the left wing lights so they all came on no matter what I did.
Oh well.
All of them on at once it is. Luckily all the LEDs flash at different rates so they kind of look like they're chasing each other. If you squint.
All that was left was to make the screen-pattern-select switch and glue it permanently in place upside down (doh!), grind down the wing LEDs to give them a square top, weather it with silver paint and this was the result:

And with the wings up:

... which completely fails to show off any of the screen lights. Never mind, here's a video of it in action:
There are seven ribs fitted to the back, but I forgot to turn it round to show them off.
Total cost of this build was probably about £6 ($10-ish) - excluding foam core and DVD cases I already had and things like glue, solder and wire.
A thousand thank yous to all who trod this road before me.
If I was going to do this again, I'd make damn sure I insulate the LEDs in the wings properly and build up the body more so it was closer to the screen prop and not so flat - that would also give me more space to fit a motor. I'd also make my own wing templates so they more closely fitted the brush curves and actually fit flush to the body when closed. I think I'd try to sink the LEDs into the wings too. I also (probably) wouldn't tape up the handle - I'm not sure why I did that other than by the time I'd finished assembling and disassembling it the damned thing wouldn't close properly. It kind of annoys me, but also kind of suits the battered look.
The hole in the handle I was going to fill in ... but I've decided to fit a ring to it instead so I can hang it from a belt fob instead of building a holster.
I know to you guys it will look nothing like the movie prop, but to anyone I'm likely to meet on Halloween it will be close enough (in the dark) for no one to notice.
Hopefully? What do you think?

 GB1 and GB 2 Uniform Build Thread:


 - By mrmichaelt