User avatar
By FossilizedArt
#181560
Hey, what's up, everybody. This thread will chronicle my progress and builds. I'm gonna try to keep it all (uniform, pack, goggles, etc.) to one thread, so as not to make a million threads for every little thing. :)

If all goes well, there'll be 5 or 6 of the locals forming a group. I'm still toying with the name for the branch/chapter, but I don't like the sound of "Stony Brook Ghostbusters" so that's still very up for debate. But I definitely have interest from friends who I told about the project, and maybe not too long from now, I won't be the only one who dreams of running around busting.

So anyway, I started out by looking around the boards, and inquiring around in the chat, and after a while of lurking and getting info and opinions, I went with a Sage Green Rothco flightsuit and a desert tan pistol belt with a click buckle from the local Army Surplus Store. (Funny story, I was explaining to the lady who worked there what I was doing, and she surprisingly knew all about how people go on scavenger hunts to get their flightsuits, ALICE pack frames, straps, she even knew the different uniforms from the different movies, but I digress.)
Image
Now, I know this isn't movie accurate, but I felt that since I'm kind of making my own little local chapter here, I could put a minor spin on it, and "define" the uniform for the region, if that makes any sense. Someone said best it in the chat: "we're not the 501st." Also pictured is the $10 pair of welding goggles which will eventually become Ecto-Goggles.

This morning, before work, I went to the post office, and behold- there's my arm patch and name tag from Katarra8 (Thank you, Katarra! Gorgeous stuff!) I spent all day at work waiting to get out so I could get back home and start sewing. The pic below is the arm patch pinned on the sleeve, and the name just sitting next to it.
Image

Sewing on the armpatch. I used Fabric Fusion to seal it down pretty good, and threaded down the edges of the patch with red and black thread. Hadn't sewn in years, so this was a wake-up-call!
Image
Image

Tomorrow, I'll be attaching the nametag, but currently, it's 2:30 am... so time to crash.

Much, much more to come. Please feel free to share your thoughts, comments, and critiques, and thank you for reading!

~Fossil
#182037
Well, folks, today I attached velcro backing to the flightsuit with Fabric Fusion, and hand-stitched it on. Then, my girlfriend went around the edges with the sewing machine. She also fixed velcro to the back of the name badge via sewing machine. I went with velcro for this application, because I plan on getting a second namepatch eventually, with my pen-name/alias on it, and I'd like to be able to alternate. Anyway, take a look-- uniform thus far!

Image
Image

After this pic was taken, I realized this shirt is the most "worn out" of my GB tees.
Image

In hindsight, I should have worn my "blinged out" GB shirt. It's black, with an oversized No Ghost logo done up in silver and ruby sparkle glitter paint. It's officially licensed, but my God, is it pimping. Eh, I'll wear that one when I take more pics, which'll be when I get the elbowpads and gloves.

I'm so jazzed right now, dudes. More later-- got to sleep, then work tomorrow. Thanks for looking!
bworld liked this
By djwilbanks
#182200
I like that "we are not the 501st" which I explained to my wife and a friend not too long ago.

Nice to see you take your own spin on it for your local chapter. Looking good! (and the velcro idea is genius)
User avatar
By lordgilpin
#182349
FossilizedArt wrote:Then, my girlfriend went around the edges with the sewing machine.
You expect us to believe this?!

It's ok to know how to use a sewing machine man... I mean you just showed a pic of yourself using a thymbol- Are you gonna split hairs here? LOL!

Seriously though, it looks good!
(I'm mostly looking forward to your Belt Gizmo.)
#182377
lordgilpin wrote:
FossilizedArt wrote:Then, my girlfriend went around the edges with the sewing machine.
You expect us to believe this?!

It's ok to know how to use a sewing machine man... I mean you just showed a pic of yourself using a thymbol- Are you gonna split hairs here? LOL!
Heh heh, oh, believe me, I totally wanna learn to use a sewing machine. I just never got around to it. :) Soon enough.
lordgilpin wrote:Seriously though, it looks good!
(I'm mostly looking forward to your Belt Gizmo.)
Thank you! I'm looking forward to construction of the Belt Gizmo too... though I'll take this opportunity to ask, what's it (theoretically) for? I WOULD ask the same about the hose, but I know that's just for making the lower part of the ensemble "busy".
#182486
lordgilpin wrote:What does it do?!

http://www.gbfans.com/community/viewtop ... belt+gizmo
This is why I positively LOVE this place. Every time I think I've looked as thoroughly as I can, I am quickly shown something new! Everyone here is so helpful. PKR it is. Thank you!

Update:

Yesterday I bought some $3.79 Gloves from Ace Hardware, but they're a little on the short side. Sucks too, because on my initial trip to the Army Surplus store when I got my flightsuit, I inquired about Chem gloves, and the lady there said "I know we have one used pair somewhere around here-- let me find them!" But alas, they were gone. Ah well. I'll probably see if they can't order some when I go back to place a special order. After all, in the end, I'm gonna need about 5 pair.
User avatar
By Jairus
#182629
FossilizedArt wrote:Heh heh, oh, believe me, I totally wanna learn to use a sewing machine. I just never got around to it. :) Soon enough.
Do it! It's easier than it looks. I took the plunge a while back and am still loving that I can sew or mend anything I want anytime I want.
#188407
Hey again, people, been a while since I updated, but got a bit of progress to share for those interested!

About the same time I got the flightsuit, I acquired the Sellstrom welding goggles. I held onto 'em for a while and didn't do anything with 'em, up until about a few weeks ago, when I added a few bits and bobs to 'em. A trip to Radio Shack yielded a 2x AAA battery case, a pair of knurled knobs (only one of which will be used here), a potentiometer (dial), and a nifty little switch.
Image

The inside, before wiring or addition of LEDs.
Image

The switch will control the on/off, and the potentiometer will control the brightness of the two green LEDs that will be inside behind the lenses.
Image

...and of course, the battery box.
Image

For the lenses, I went with elements of the Paranorman Ecto-Goggle/Spectra Visor plans. Tonight, my girlfriend and I made a last-minute run to Home Depot, about 5 minutes before closing time. Running all over the place like the final obstacle of a mid-80's Nickelodeon game show, we collected the parts and got the heck outta there. In total, I think it came to around 5 bucks and some change.

Image
Image

The Halex 3/4" Set Screw was a TIGHT fit, and as such, I didn't screw it all the way down yet, since I am gonna wait until after painting.
As for the wider lens on the right (the 1" female adapter), I think I'll get a really short length of pvc pipe that's the same width as the insulating bushing, so I won't have to simply glue the adapter to it, but rather, have some kind of sturdy piece between them to reinforce any glue I use. I don't want these things snapping off from a ding on a doorframe.

Oh, and that little metal pronged ring from the Halex 3/4" set screw, I totally didn't like how it looked on top of the 1" female adapter, so out with that.

The goggles with the unpainted lenses just kind of sitting on top for now.
Image
Image

Now, looking around at all the many MANY builds I've seen here, I know that this is pretty common to see the welding goggle approach. But hey, this is my first time, and I wanted to share my journey, as it were; so I apologize if this thread's ever boring or anything.

In closing, ordered some 3-Piece Volleyball pads from Cannon Sports, yesterday, so they'll probably be showing up in the next day or two! More updates to come! Thanks for looking.
By rimshot
#188797
I reallly like the look of the OD flightsuit. It will look especially nice if you have several Busters together all wearing them. It would really make your chapter look unique. Its nice to see people stray from the norm occasionally, keeps things interesting.
#188988
rimshot wrote:I reallly like the look of the OD flightsuit. It will look especially nice if you have several Busters together all wearing them. It would really make your chapter look unique. Its nice to see people stray from the norm occasionally, keeps things interesting.
PRECISELY the idea I'm going for! I HAVE to do my own thing, I usually hate uniformity... so if I am to wear a uniform, it's gonna be my own! :D Thank you!
#189706
A little progress-- Been pondering and musing over the Belt Gizmo/PKR lately, wondering how I'm gonna go about it. Tonight, I went on a window-shopping scavenger hunt. I went to Home Depot, Lowes, and Sears, just snooping around and checking out availability and prices of stuff. I'd initially picked up the Sellstrom goggles (in the first image of this thread) at a smaller branch of Sears, and bought them on sight, but then I saw the other brand of goggles with the flip-up front, which just looks better, a little bulkier, etc... I spotted these tonight in Home Depot for 11 bucks, and jotted it down for later, when I can better afford to switch 'em out. Didn't buy anything tonight, though.

I was checking out holsters, and I spotted the Craftsman tape holder one. Now, I like the look of this one, and I know that it can be modded to be pretty damn accurate, right? But the thing I just couldn't get with was this: that's SUCH a big "loop" around the front, for one simple card... Now, dig this; right next to that holster was another Craftsman tool holder-- it was belt-mounted, just like the tape holder, but BOXY and mostly enclosed. There were rivets, 5 of them, going up both sides, and across the underside. I tried looking it up on Sears and Craftsman's sites, but it's not showing, which makes me think that it's either brand new, or being phased out. I kind of liked it more, and if it's there in the next two days, I'm gonna get one... I have some ideas for it. I think it'd make for a really nice, suitable holster for the PKR.

In other news, I painted the lens enclosures for my goggles tonight, a couple o' coats of Krylon flat black. Looks good, man. More pics very soon.
#190135
Hey again, more progress:

Took the clear screen out of the goggles, and glued 'em right to the front:
Image

Then I glued the Halex insulating bushings to it directly, masked everything off, and hit it with a few coats of flat black. Here's what I wound up with.
Image

As you can see, there's also the addition of a little Amerock black plastic knob from Ace. The knob is usually for cabinets or drawers, but works great here as a rotary knob. There is still a lot more to be done with the goggles, but they're really moving along now! Fuzzymath, I'm still looking for printer cable, so I can take the pins from it. Let me know if you find any laying around!

Anyway, I checked the PO box today, and guess what arrived?
Image

Hell yeah. I tried 'em on, and I never imagined how snug these things are.

Here's the pads, stretched over a pair of 2-liter bottles with paper wrapped around them (so the barcodes on the bottles don't get paint on them-- we recycle them in the bottle-crushing machines at the grocery store!)
Image

The paints I went with were Krylon; flat black, and hammered metallic black. I used this thread to guide me through the proper method for painting the pads. Image

One light misty coat of flat black so far:
Image

Hanging in the bathroom, with two light mist coats of black, and two coats of hammered metallic black. I have them hanging inside, because at the time of painting (which was on the front porch), it was about 37 degrees outside, and pitch black... so yeah. It's warmer inside.
Image

The pads still have to be hemmed and the inner elbow "black patch" still needs to be added, but I slipped 'em on the uniform just to get a feel for how this is gonna look. These pics don't do it justice; see, I was going for an iridescent "flip-flop" dark grey reflective look, like what's seen on firefighters' uniforms, and I pulled it off perfectly! It doesn't shine a LOT, only very subtly. Less is more!
Image

The pads will be hemmed up and completed in the next night or two, and I still want to acquire an inexpensive lint shaver to soften things up a little. Stay tuned!
User avatar
By FossilizedArt
#191036
Hey there, all, thanks for looking!

So yeah, I mentioned a few posts ago that I saw this boxier belt holster in Sears Hardware, right? Tonight, I went back and got two of 'em, one for me, and one for whoever else around the area starts working on their uniform soon.
Image

First thing to do is cut that Craftsman flap off, 'cause I just don't think I could handle the whole name placement on it like that. Tell me if you disagree. I also slightly widened the slots for the belt to go through.
Image

Jairus's PDF, and a sheet of white styrene. About this time, I really wish I had a dremel... 'cause cutting this with a box cutter blows, and I still have a long way to go.
Image

Size comparison:
Image

Now, I know that I will have to paint it again after I cut it up, but I couldn't wait. I slapped a coat of flat black on it, and threaded my belt through, to see how it looks. The printed circuitry is just sitting on top of the cut styrene, and it fits inside very nicely. Don't worry about not being able to see the greeblies; as I mentioned before, it's gonna have a lot more going on when I cut a great deal of the front off, to make a little window. I'm considering putting a sheet of clear vinyl in there, so the inner workings will be visible but still protected. In time, in time.
Image

Stay tuned, and thanks for looking!
User avatar
By FossilizedArt
#192899
I have no power tools whatsoever. No Dremel, no drill, nothing. So I hand-cut the board with a box-knife, and painted it brown, then applied the circuit printout to it with glue. I heated up a needle gripped in pliers on the stove to poke a bunch of little holes in the styrene board.

Threading copper wire through...
Image

...one strand of copper for each of the 4 main chips...
Image

...then covered in hot glue for security! Nice and tidy!
Image

The Daughterboard. I slightly elongated it for the sake of adding some technical bits. Not TOO much, as I know it's gonna be obscured when there's a pack present, but still. IF kids ask questions, it's good to give them technical-sounding answers, instead of "er.. this hose just tucks into my belt." See below!
Image

Clip from a found tape measure on the side of the road on my daily walks to work:
Image

Added a copper heatsink and an old (1980) chip from an ancient motherboard, when Intel and AMD were still working together. I nicknamed the daughterboard the "sniffer board" since it's what takes the sample of radiation from the hose, and then transfers that to the PKR monitor. The hose is connected with a 3/8 street elbow from Ace.
Image

Here's what I did with that Craftsman pouch from the last update... cut a nice opening in the front so you can see the innards, as well as an easy-access port for connecting the cable from the daughterboard. It's just me, probably, but I think this is much more fitting for the gizmo than the big loop on the tape measure holder. This is pretty much made for it, and it shows off all the detail of the board's circuitry. Still gotta add more diodes and stuff I've ripped from a scrapped modem.
Image

I am looking around for inexpensive nixie alternatives. I have an extra 2 feet of hose, I might experiment with it today, and see if short lengths look good as nixies.

Oh, and in other news, I weathered my elbow pads. Got a lint shaver, wore 'em down a little, then rubbed them on the carpet, and voila, years of wear.
Image

Also I added the black patch area on the front, with black elastic sewn on.
Image

All that's really left on this uniform aside from minor aesthetics is the hose connector! I once saw a thread about DIY hose connectors made from rubber chair feet, but I can't locate it now. If you know where it is, please point me in the right direction.

More to come, as always!
#193014
Hey dude, lookin good - you're quite the stud muffin if I may say so (not to sound queer or nothing) I've got an olive green flightsuit myself, I think they're totally underrated. Anyway, if you're looking for a hose connector, I've found that hair spray bottle caps work perfectly (I wanna say White Rain brand). You can find them in silver, and they're just the right size for the hose (a bit tight in fact, so once you jam the hose through, it won't slip off for anything).
#193038
ghoulishfright wrote:Hey dude, lookin good - you're quite the stud muffin if I may say so (not to sound queer or nothing) I've got an olive green flightsuit myself, I think they're totally underrated. Anyway, if you're looking for a hose connector, I've found that hair spray bottle caps work perfectly (I wanna say White Rain brand). You can find them in silver, and they're just the right size for the hose (a bit tight in fact, so once you jam the hose through, it won't slip off for anything).
Ha ha, thanks, dude. 8)

You mention White Rain hair spray bottlecaps - like this one?
Image

While it might work, I'm not sure. How would I attach it? Maybe get something to thread into it from inside the suit leg to hold it in place, perhaps?

After looking at this, I looked at the caps of most of my girlfriend's toiletry products, and they're all the same kind of cap! Now I'm thinking a trip to the beauty supply store is in order, because they might sell these caps on their own, and if I combine this...

Image

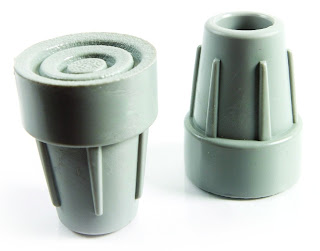
...with rubber chair/crutch feet (in the appropriate size), such as these...

Image

...I might really have something! I would be doing pretty much what was done in THIS THREAD, only without the PVC, only the larger rubber foot as a base, and the spray cap inside! I think it could work.

Thank you for the idea!
#193775
Uniform update!

This evening, I stopped by Ace one more time. I'd been eyeing several components there, and tonight I snagged a few of 'em. Now keep in mind, if you get these items, you are pretty much getting parts for several hose connectors, which is perfect for multiple 'Busters! Check out the following (bold text is links to the item in Ace online store):

Rubber Cane Tips (If you buy 2 packs of these, while only one of everything else, you've got exactly 4 Hose Connector kits!)
Image

Grippers
Image

Vinyl Tips (MAKE SURE THESE ARE 1/2 in.)
Image

Plastic Tips (MAKE SURE THESE ARE 3/4 in.)
Image

So, you take one rubber cane tip, and at the base, cut it down so it's half as thick down there, and so it's relatively flat on the bottom. (they're somewhat concave when you get them).

Then take one Gripper, and on the flatter side (that would go up against the leg of whatever furniture it was to be screwed on), there's an indented ring. Perfect guide for drilling the 6 holes. Me being without a drill, it was back to heating up nails on the stove. Thankfully, this is rubber, so it was quite easy. After you have the holes in it, take one of the screws that comes with it, and screw it right through the hole in the center, into the bottom of the rubber cane tip. If you cut it flat enough, it should be pretty seamless. There's a metal washer inside the tip, which has a small hole in the center. This can be seen from the top of the tip, if you look down into it. It will serve as a perfect exit hole/guide for the screw. A nut and bolt could also be used if you wanted extra security.

The Vinyl tips were pretty cut and dry. I took another screw from the Gripper set, put the 1/2 tip into the 3/4 tip, and screwed them together. Then I glued the 3/4 down inside the Rubber Cane tip. The 1/2 grabs the hose snugly, and doesn't let go easily, though it is intended to be the kind of thing I can disconnect when need be.

A few coats of black paint, since I figured the OD green would be too tricky to try and match perfectly, and I don't want to buy anymore spraypaint right now. Besides, I think it looks pretty nice, after weathering it a little.

Stitched 'er on, and took a few shots while wearing it:
Image

Image

And did the 10-second set-up-and-run/pose with the camera delay shot. With that, it's pretty much done! I only have a few minor things to do to the PKR/Gizmo/Circuit now, like add tubes, and more little greeblies.
Image

Rear shot, for a good view of the daughterboard and how the hose comes from it. Note that here you can see the 5 rivets going down the side of my PKR holster for the first time.
Image

More PKR updates to come! Tell me what you think, leave me some feedback, and thank you for checking it out!
#196374
First update of the year! Happy 2010.

So I felt like working more on my Belt Gizmo/PKR today. I felt jazzed because my second nametag came today, and now I can alternate! Thank you once again, Katarra8!

Image

Actual last name, and Pen-Name/Tattoo Handle.

Anyhow, a friend and soon-to-be fellow local buster came by with a big bin of antiquated PC parts yesterday, and so now I've got tons and tons of little electronic greeblies to toy with. Old tiny-capacity harddrives, a couple sound cards, motherboards, cables and wires (Fuzzymath, I got LOADS of those tightening knobs now, for my Goggle lenses! Thank you for the idea!) I think the most abundant thing, however, was modems.

Image

I'm going to be plucking these apart when I build more belt gizmos down the road, but for now, let's finish this first one, shall we? I harvested lots of resistors and the like from here and there, and glued them to my PKR and daughterboard.

For the Nixies themselves, I didn't want to have to deal with fragile glass tubes, and I couldn't afford 'em anyway. I had a few extra feet of clear hose, and with the various cables I acquired, I made a new recipe. I cut up one of the cables I'd acquired, and removed the inner wires, putting them aside for later. I had some extra hose (same as the leg hose), so I cut that into small lengths also.

Image

An assembled Nixie, with printed digit insert, glued on a piece of cable (with all its' internal wires removed), and placed within a short length of clear hose. It's a snug fit, so I sliced the backside of the clear hose open. It's not pictured here, but I also used heat-shrink on the tops of these, just for the look.

Image

Then came the long process of circuitry needlepoint again. Heating up straight-pins on the stove to poke 80 little holes, then plucking those little wires through said holes with needlenose pliers, and let's not forget having to re-poke heated needles through the holes if they're not big enough. Fun.

Note the added bits and bobs, circuitry-wise.

Image

Image

Heatshrinking the wires together before inserting them into the hollow cable within the clear hose.

Image

Completed PKR/Belt Gizmo. I'm gonna leave off that little solar-collector thing that usually goes on the right.

Image

Here's the top of my PKR. I found one modem with freaking DIP SWITCHES on it... so I had to yoink those. Gives this device more interactivity, I think.

Image

Daughterboard Update:

Since my last post, the connection point for the hose snapped off, so I wanted to find a slightly more flexible solution. The answer came by punching a hole in the board, and putting a rubber plug through it, then screwing the brass elbow onto it/gluing it down. Now it has swivel capability and the plug's back area (red arrow) keeps the brass front from rubbing away the circuitry facade.

Image

Image

So yeah, for the most part, my PKR's really done now. I MIGHT still go get those orange little capacitors, but I don't know-- they won't even be visible here, and I won't be taking this thing out of its' pouch all the time. Maybe I'll break down and go get 'em.

Image

Image

The next thing I KNOW I'm gonna do is replace the hose connector I built in the last update. It's great, but simple mistake. I should have thought to look for all those rubber/vinyl tips in BLACK. When I painted the first one, the base and tip (not the cone-shaped middle) somehow reacted with the paint, and now they're always sticky and leave black all over my fingers, and I fear it staining my uniform. So yeah... if you ever use the formula I posted, get black parts instead of painting it black. :)

See you next update, and thank you for looking!
#196611
This is the best step by step guide that i could find lately of compleating an uniform the creative and inexpensive yet accurate way! I like the way you managed to buit the circuit board, hose connector, elbow pads and circuit pouch!
Thanks for the tutorial!
PKE Meter build project!

DO you have this files on sale?

Also, sorry I can’t answer the question, but[…]

There's some fun dialogue TV-edits, a replacement[…]

Thanks The_Y33TER ! Confirmation there's no elect[…]