- September 18th, 2016, 1:09 am#4880858
I have always wanted to BUY a proton pack, never thought in a million years I'd ever have the gumption to build one- and then one day I got the crazy idea to make a GB Web Series so now I'm building 4 Packs, 3 Ghost Traps, and the various uniform additions (Lifegard II, Mortorola MT500, Belt Gizmo) for four uniforms (I don't recommend this). After a lot of trial and error and a LOT of help from good friends I'm going to put up as many tips as I can and try to put up as accurate cost analyses as I can for the whole process to give a look into what it's like as I'm sure there's many questions on 3D printing and it's effect on the propbuilding world. At the very least- you still have time to make it to Halloween. I'd love to post pictures, but I'm a noob to these things. There's some up at facebook.com/ghostbustersseries and even more on Instagram @ghostbusterswebseries.
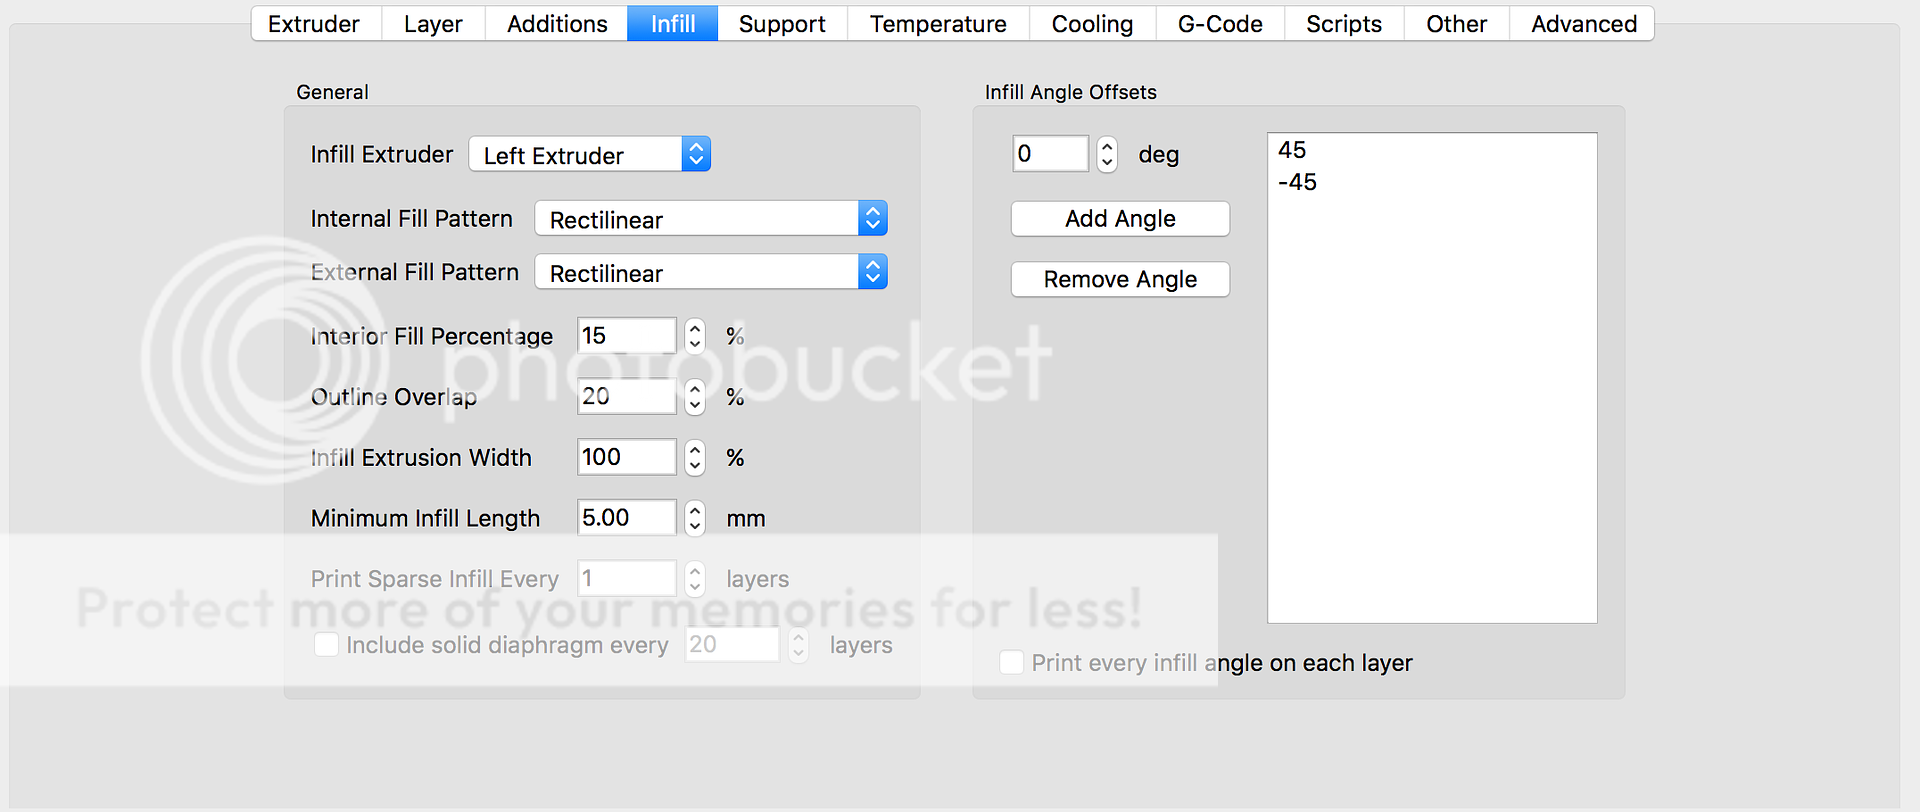
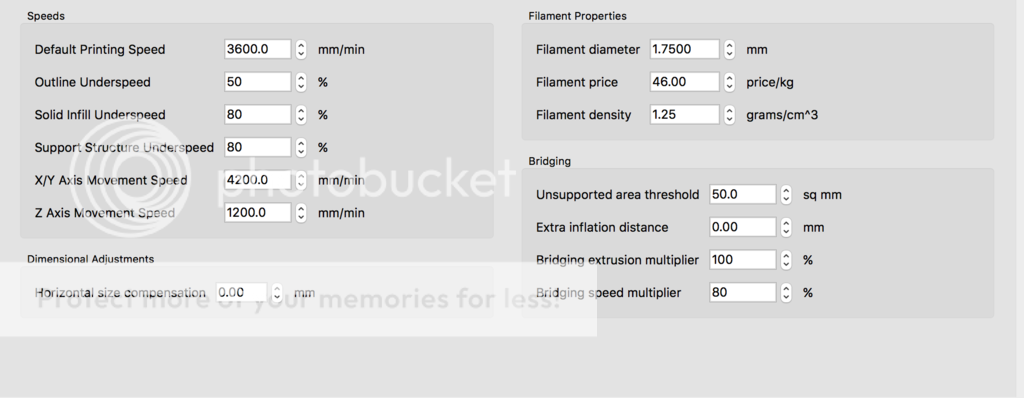
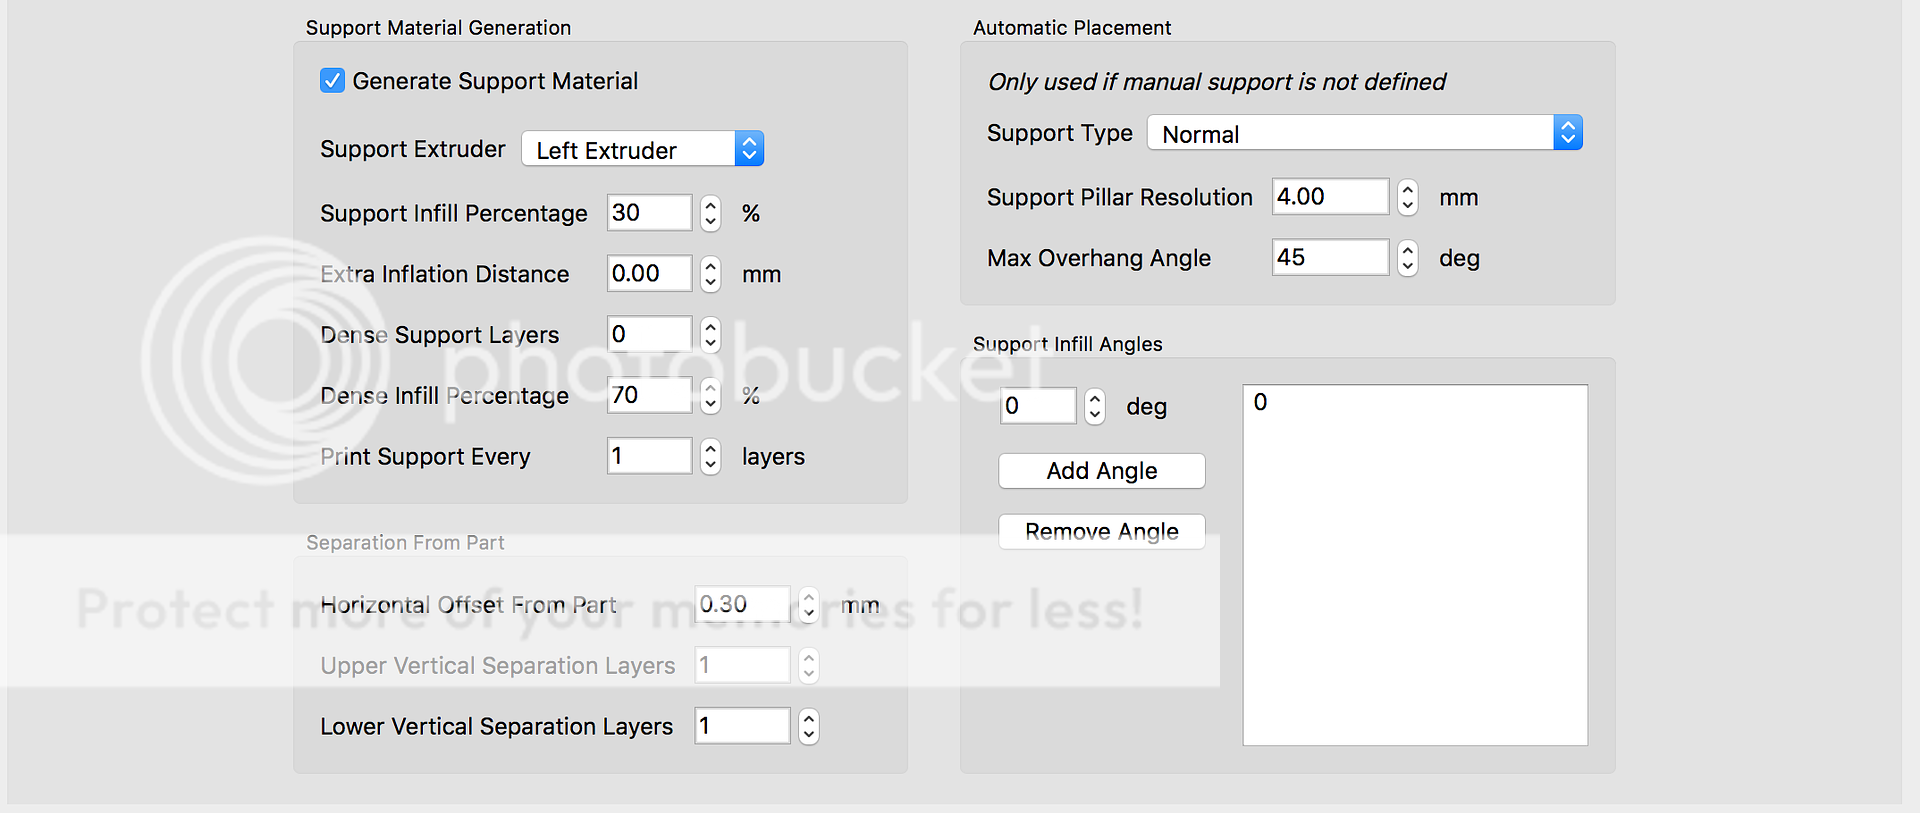
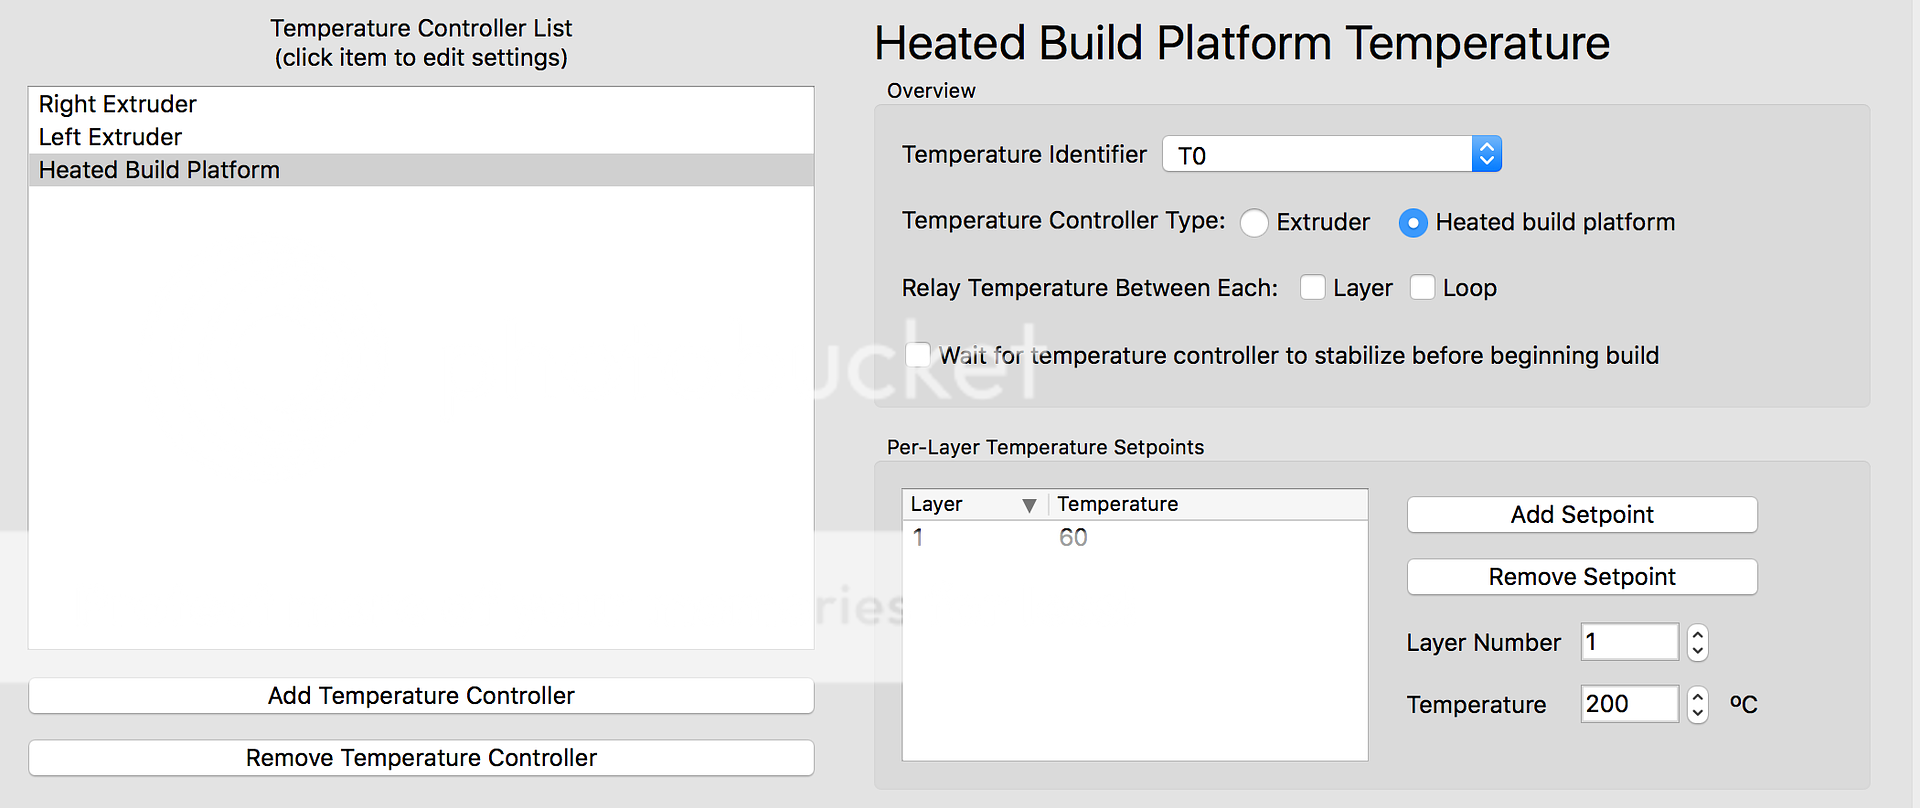
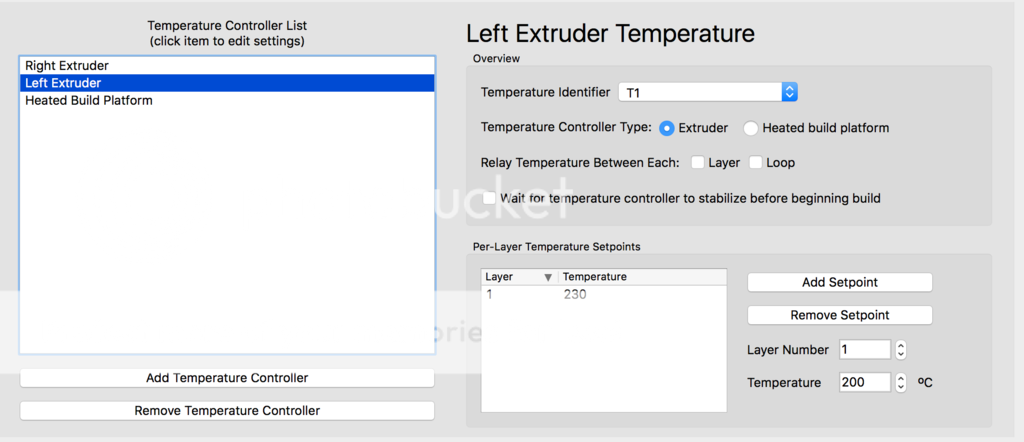
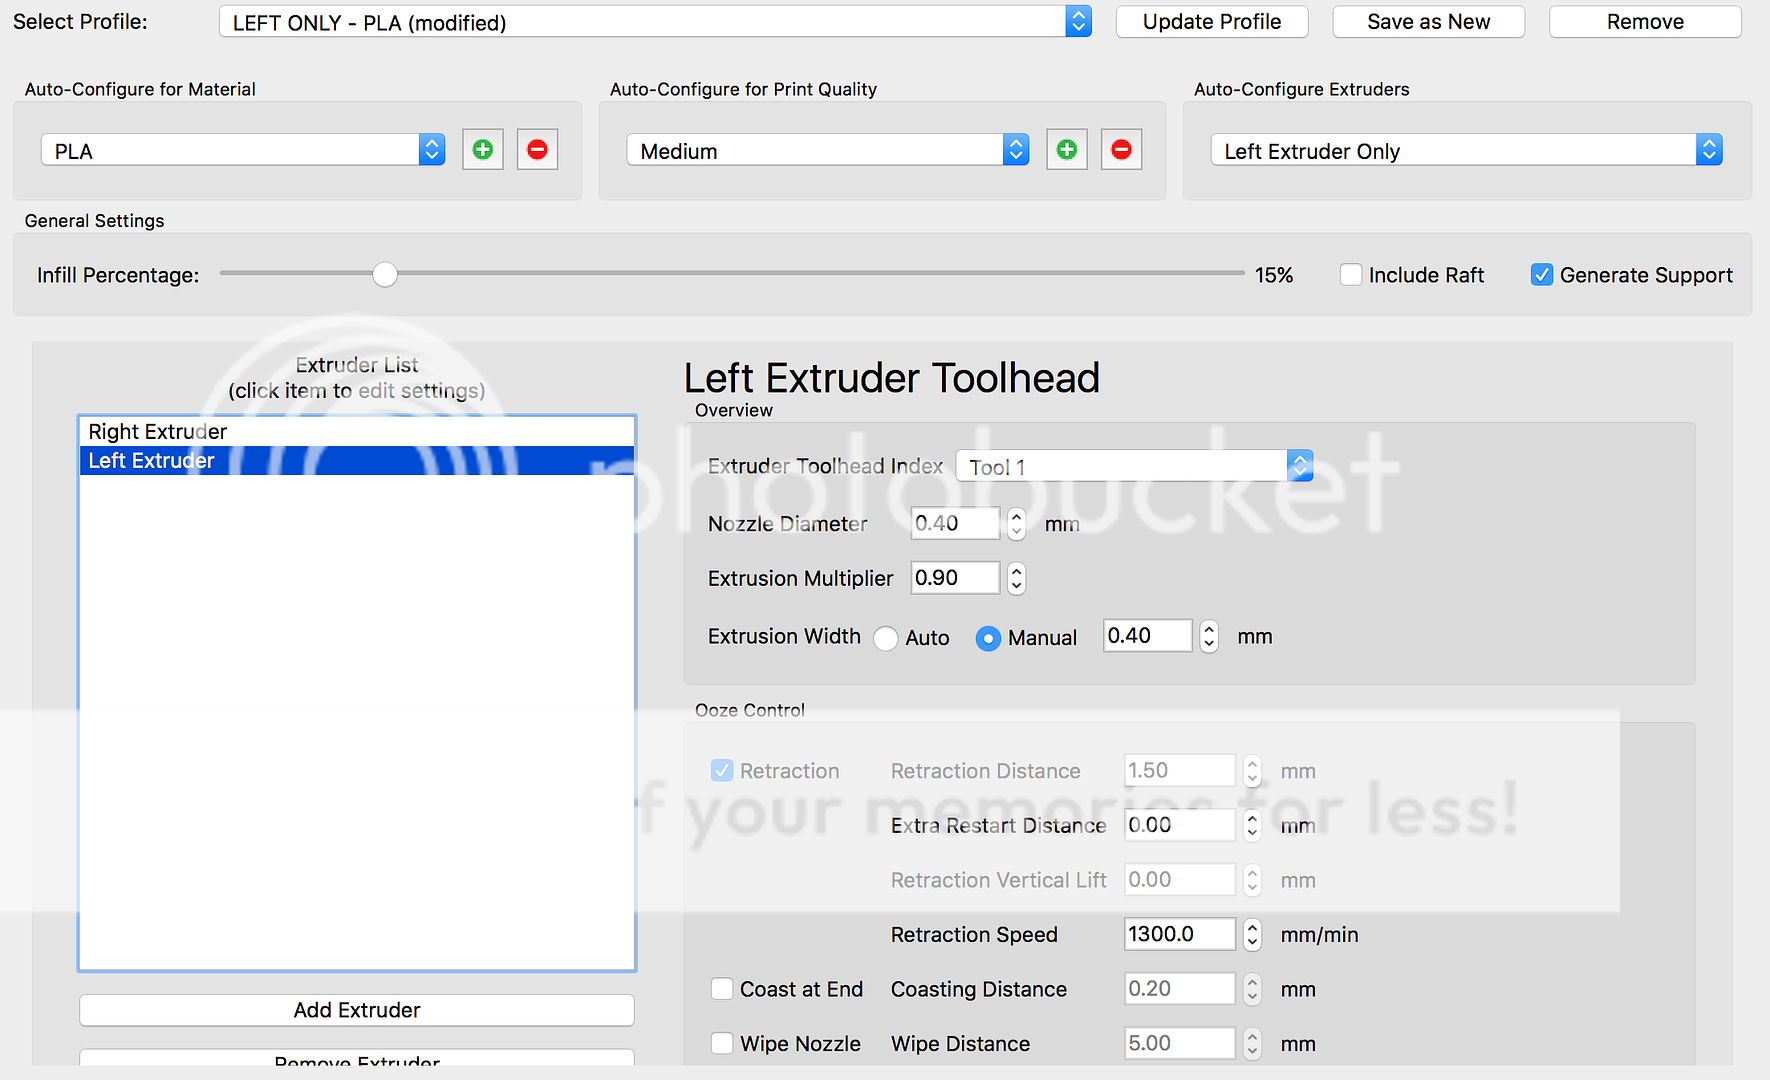
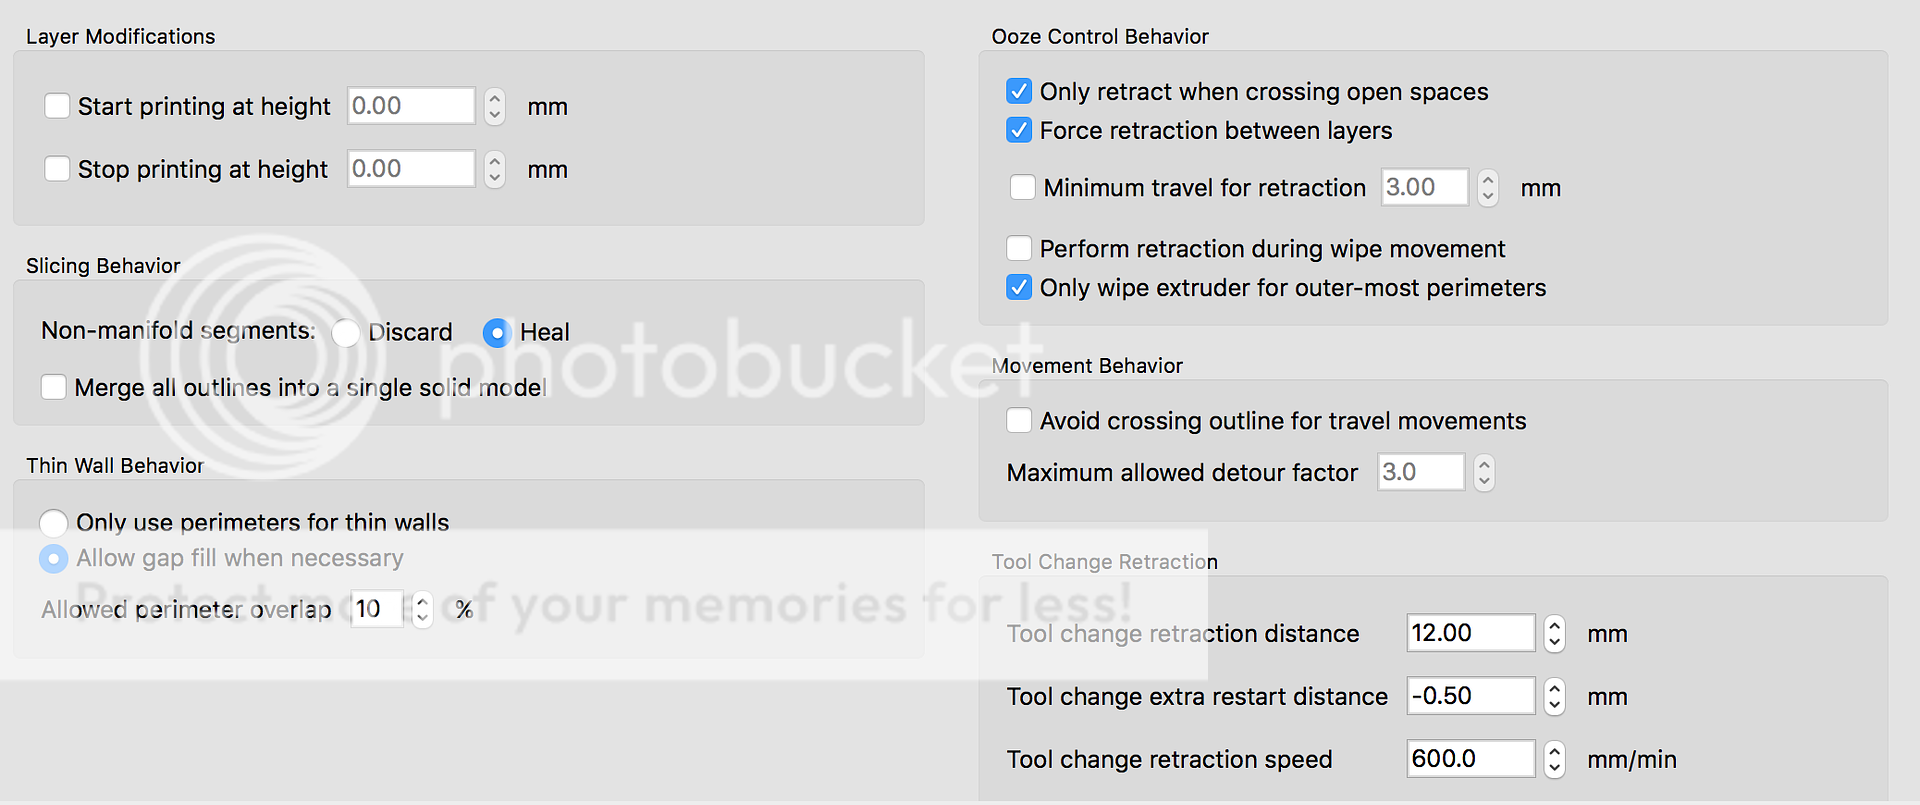
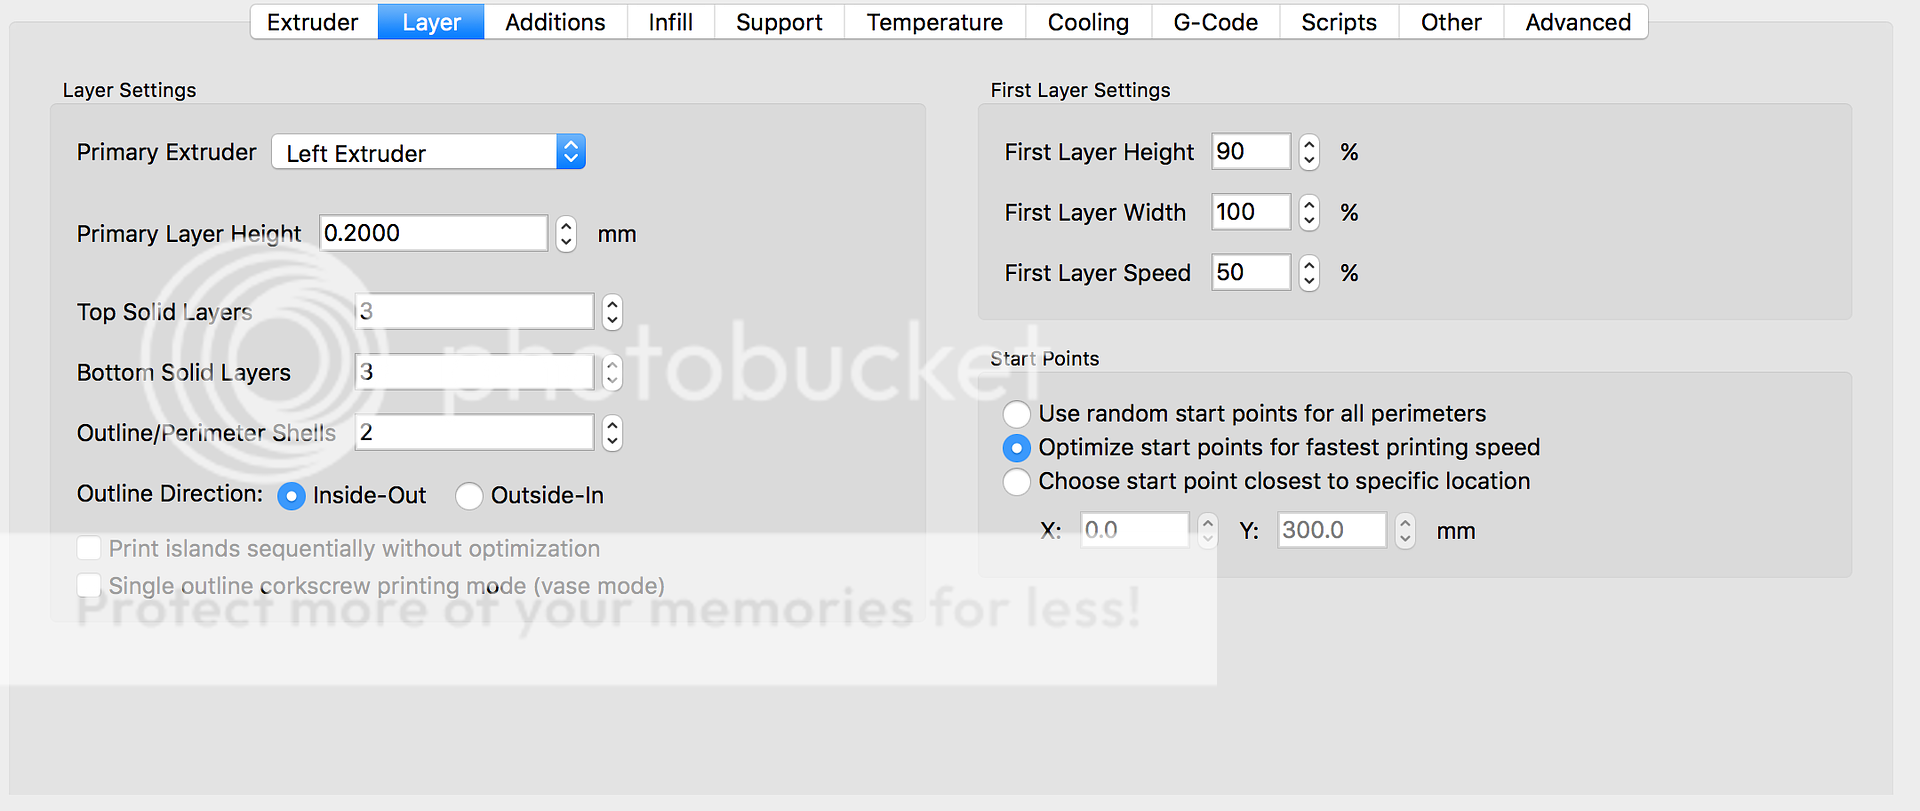
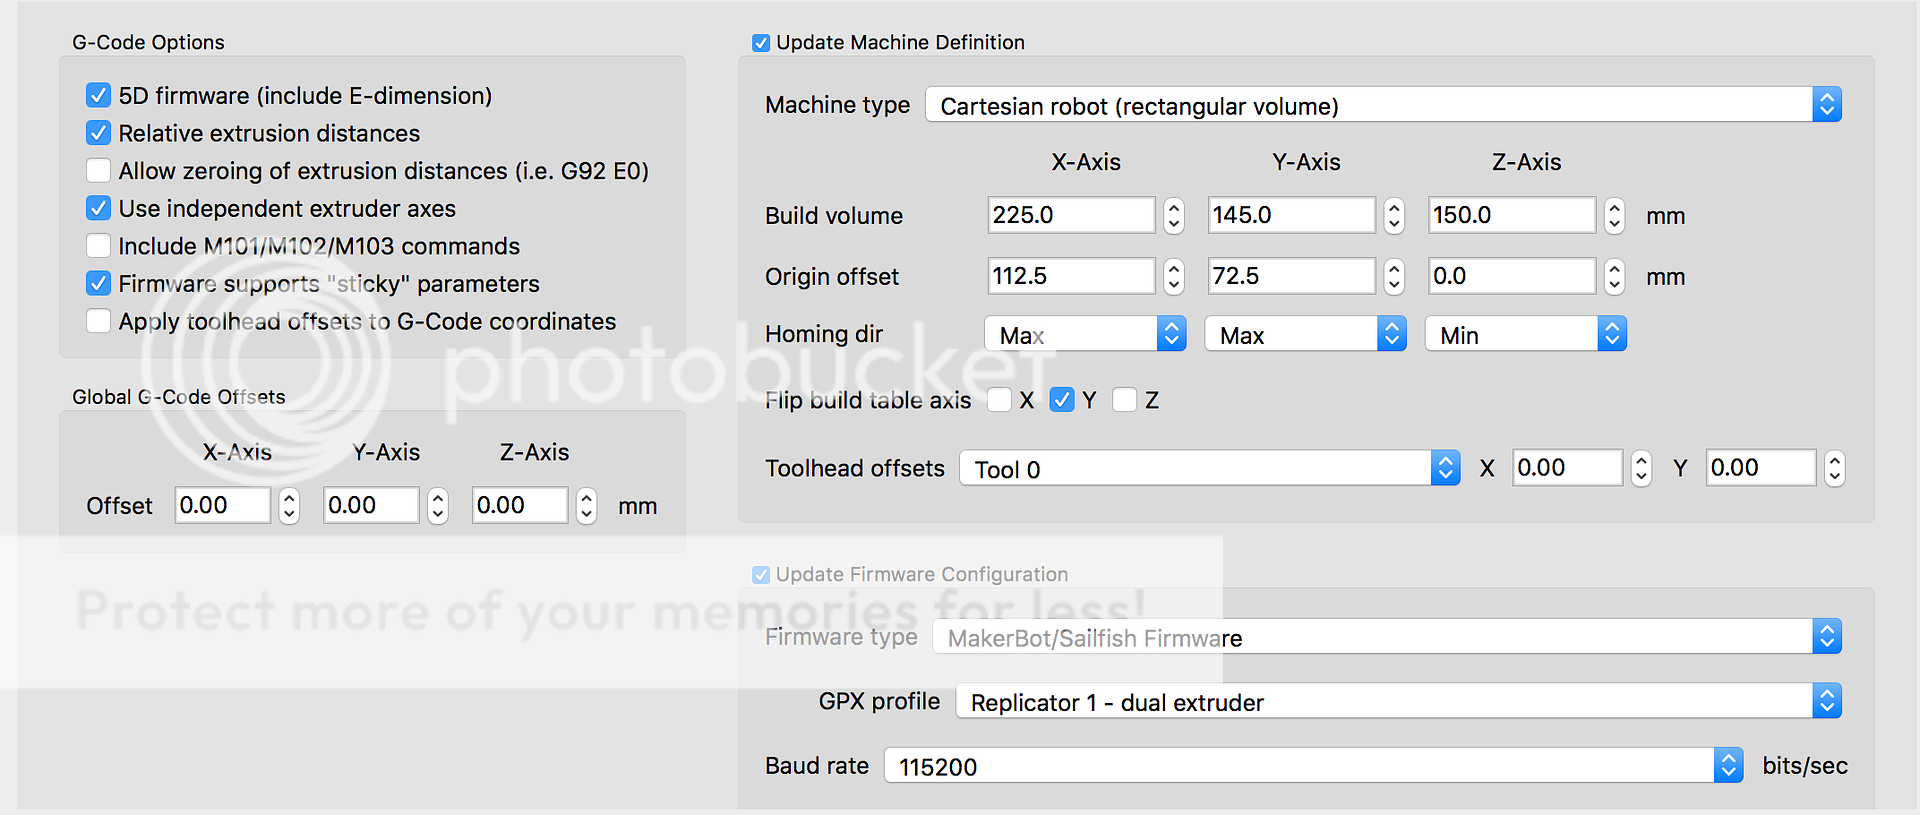
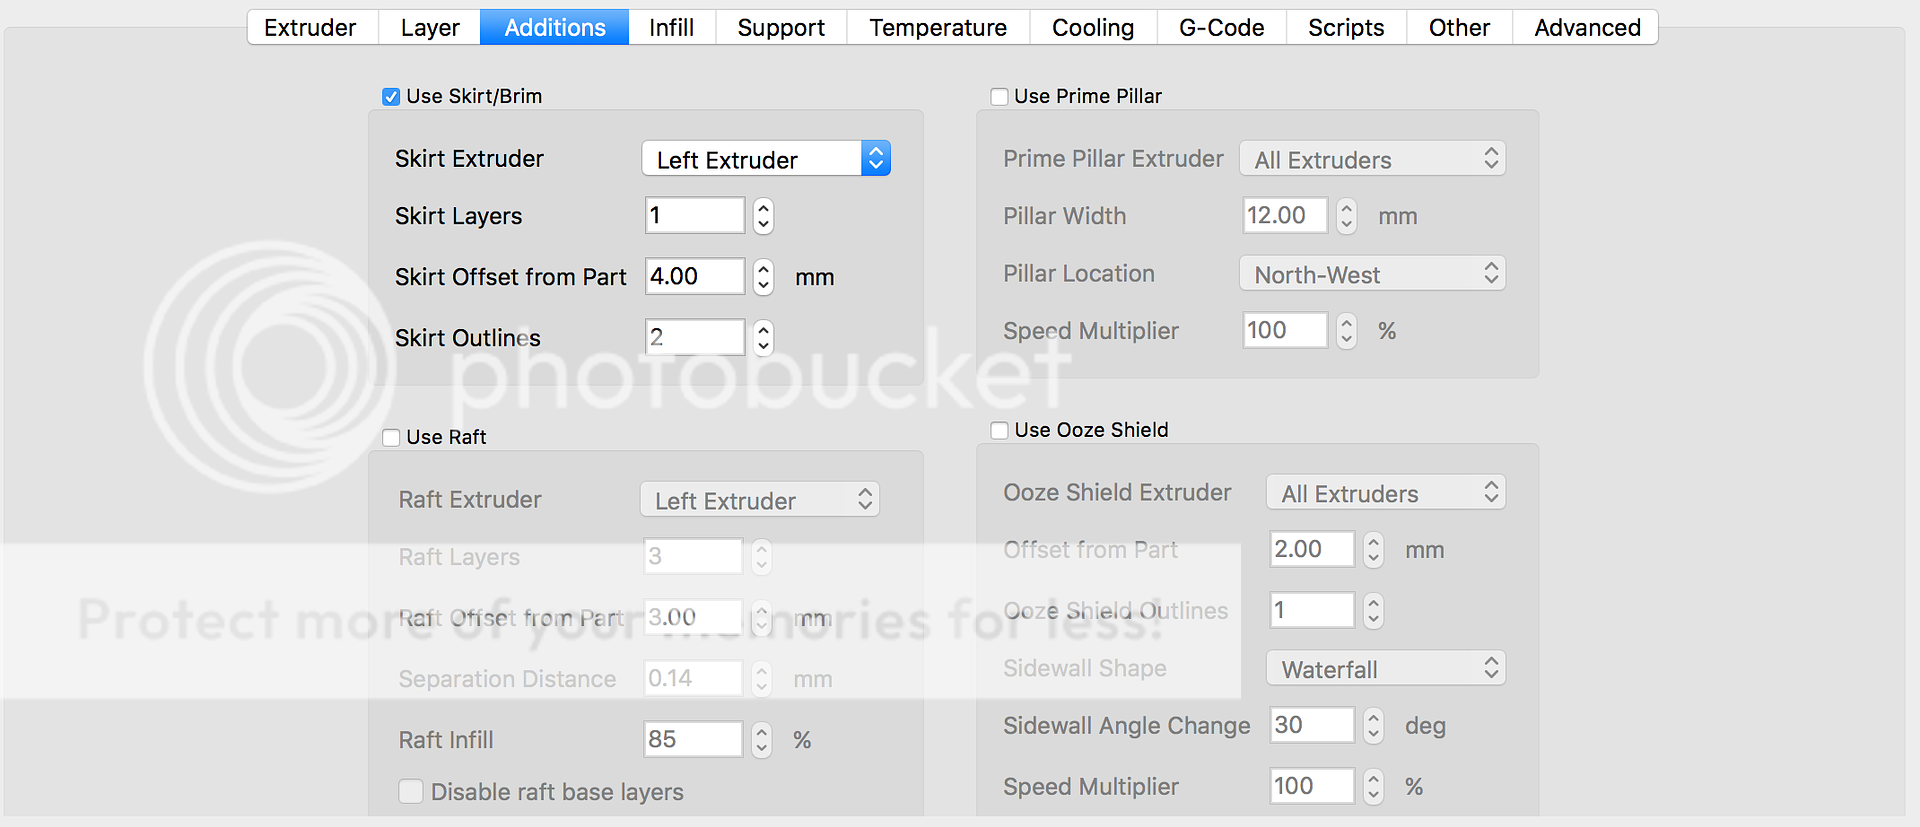
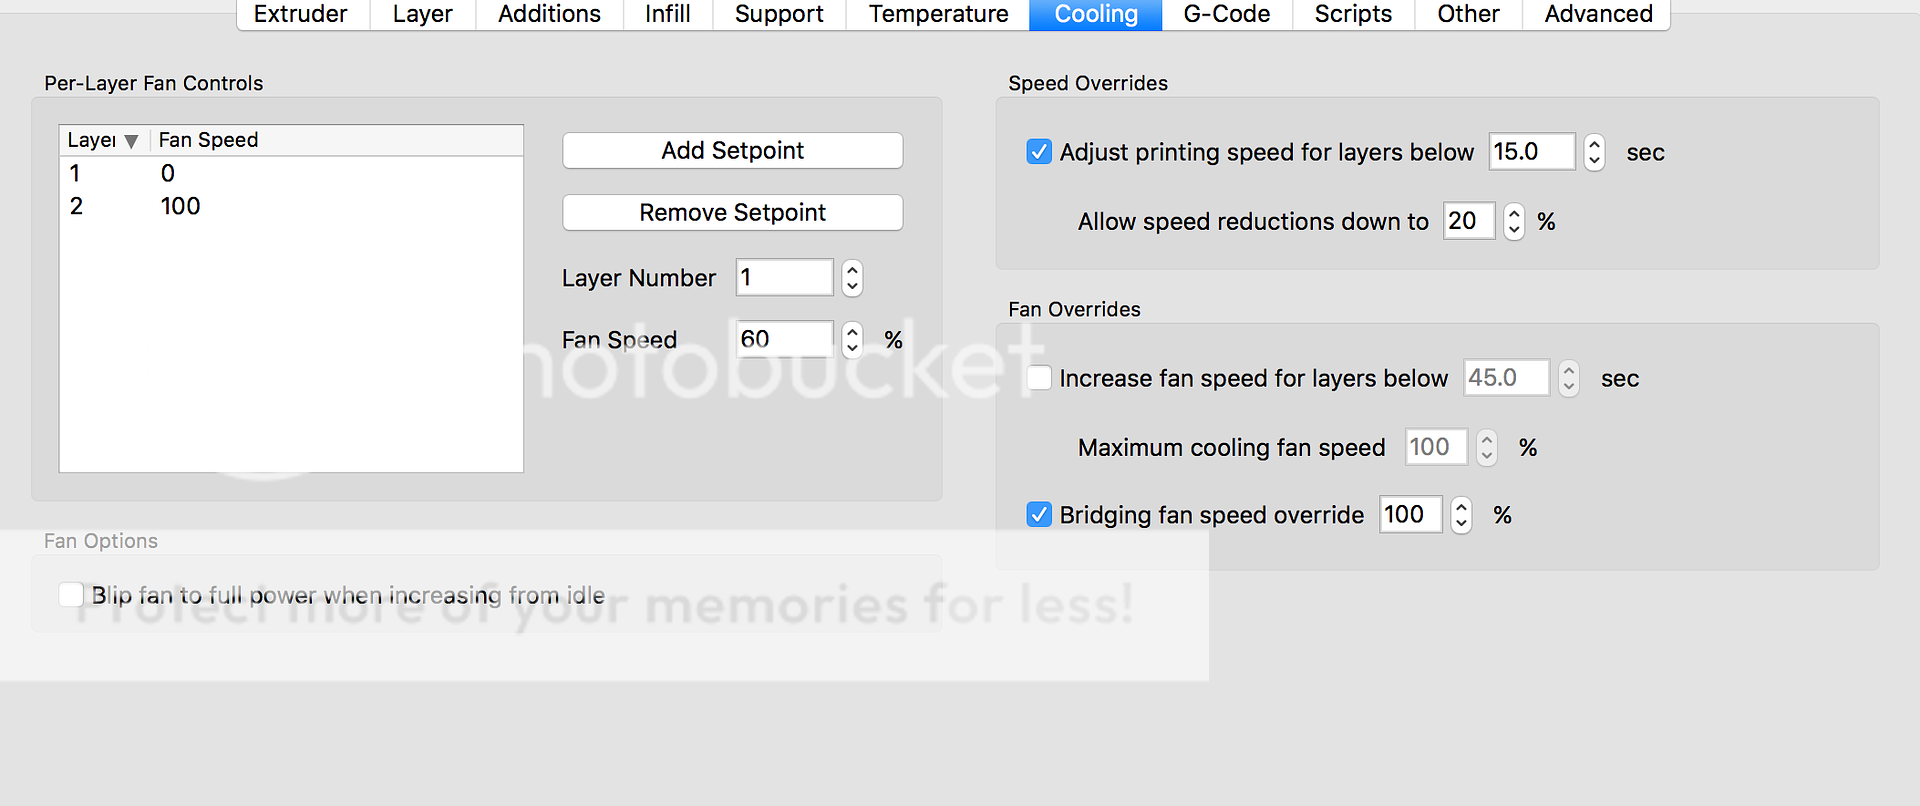
First off, I'm not a prop builder, I am just a filmmaker who loves Ghostbusters and had some free time this year. So if I screw up terminology, or leave a pressing question unanswered- just ask below. My only exposure to other packs is what the local GB franchise graciously let me look at, and explained the process of the aluminum/fiberglass packs. From what I can tell, there's detractors and benefits on both sides. Also, on accuracy: From what I can tell tgoacher's pack and gun, countspatula's trap, and supplemented parts from NewHobbyist (the ones I'm indebted) are pretty friggin' screen accurate. I also will be using daniel_nelms's Mortorola MT500 with tgoacher's belt attachment for it and jason407's Lifegard II model for uniform elements (The belt gizmos are hardly going to be on camera so I used Andrew Snavely's guide and made one for 15 bucks from dollar store elements). I say all that to bring up propmaking in 3D printing is usually a 4 step process- digital design, digital design cut up for print bed, print optimization, and finally assembly of printing. The digital design and cut up have largely been taken care of for you by the community already. Optimization is really dependent on your machine, I am personally running a Flashforge Creator Pro which I bought from Wal-Mart for 970 bucks. Barring research for your specific situation- the Creator Pro is one of the higher end Prosumer models (Professional models will run you in the tens of thousands). The great thing about this machine is that the print bed is pretty huge, any plans you find online are going to fit on it. Also, I get to pick my software since the Creator Pro is open source (More popular MakerBot is the "Mac" of the 3D print world), I use Simplify3D (100 bucks, but well worth it) which is what optimizes the print. Warning for another machine; it took WEEKS of trial and error for my good friend Efraim to finally dial his Flashforge into settings that work the best. Not to say all prints failed (although some did), but if you go down the path of a Flashforge I can post all of our settings on here.
Speaking of time, I'll give you some perspective, the Lifegard II had two parts to print. It's completely hollow inside, so a LOT of support had to generated(Stuff you just pull off after the print). Total plastic cost for two Lifegards and two radios the best I estimate is about $1.50. Buy two cans of spray paint for four bucks and that's all you need.
This print took 9 hours and 14 minutes. I left it going overnight and it was finished in the morning.
There was about a three week span where I was printing non-stop, a 9-10 hour print at night, an 8 hour one while at work, and a 1-3 hour one in the evening and only had maybe 2 failed builds, which I traced to one little tiny element in the trap parts that had some ghosting in the design so it started printing in thin air. Ghosting doesn't happen often, but when it does you usually can just print the one item by itself and it solves the issue. So in 7 straight days of printing, I was able to print 4 complete proton guns (except the handles which I just used PVC for about 5 bucks for all four), 1.5 traps, and 2 booster tubes for a proton pack (which is one of the longest prints)- all of which was a single roll of PLA plastic for $29.99 (DO NOT scrimp on your plastic, I buy mine from MatterHackers and the entire first pack was completely printed before we had the printer fail a build). That being said- we only failed when we switched plastic colors, long story short- your settings really matter on your plastic color. Efraim is Dutch so he randomly picked neon orange, and it has turned out to be our best color for our settings. Conventional wisdom would dictate you'd probably want to get black, think of this though: you're going to probably have to paint anyways. Most striations from the print go away with a single coat of grey primer, then when you put black paint on top of that- there's almost none left, and a wee bit of sanding will take care of it. The only rough thing is the parts you have to split up to fit on the bed. For example; cylcotron is cut up in four parts. Tonight I attempted to put some plastic wood on the crevices of the syncrotron , and so far you can't even tell it's not one piece. So far, I've only had to sand one piece to fit, the injector tubes to the attachment that goes on the powercell. Other than that structural issue, I've not needed to sand anything because of the two layers of paint already on it (got the idea for the plastic wood after I painted).
The stuff you CAN'T print is exactly what you'd think: the motherboard, the ribbon cable and wiring, the screws to structurally attach stuff, the split loom, and the electronics. You can print the tube parts of the handles, but I've found tubes are the most time consuming thing to print so buying PVC was the better option as I'm filming in December and have a ton of crap to print still. The electronics have been a labor of love of my cousin Scott and he decided to go with a raspberry pi that we've utilized python to program the controlling of the lights, and sounds through. We analyzed the one right here on GBFans and it's pretty spectacular and for around 250 bucks it's a steal to have everything ready to go. We went with the raspberry pi set up because if the first episode is a hit, we're going to be programming an IR sensor in the barrel of the proton gun to set off squibs live on set as well as set off our "flash bulb" for lighting the actors when the fire their guns, or at least that's the goal! The motherboards for all four was about 20 bucks worth of MDF, without the electronic guts inside- although they're less than five pounds- I can lift the entire pack above my head with little to no effort. I'd say total it will be around 20 lbs, which is great for stunts. On that note, the plastic is pretty durable, I'm not worried at all for being on set and jostling it around a bit. If it is hit by something, the final two layers of paint will be designed to give it a "wear and tear look" and any hits on set will reveal peeks of silver/grey.
All in all, think of 3D printing as flying the Millennium Falcon instead of a Star Destroyer. Star Destroyers have maintenance bays, customer support, and IT Guys to fix problems. The Falcon is literally Chewie and Han throwing crap together to make it to the next job. I have a TON of support helping me when things go wrong- right now three printers are going at three separate people's houses so we can get these done before December, and Scott's working on electronics as well as helping keep the machines running. One pack on a schedule of constant printing (Day, Evening, Night) will take around 15 days. Ghost Trap NO PEDAL- 4.5 days. Machine 1 has had no problems, but it's smaller and goes slower, Machine 2 has had one spaghetti failure because it was the hottest day of the year (plastic didn't adhere and just makes a plate of mom's spaghetti) the entire duration, Machine 3 has had two catastrophic failures. Nothing that the forums couldn't clear up, but the machine was out of commission 1 day, then 3 days, I still haven't had to buy any new replacement hyperdrive parts, but have had to bust out a hydrospanner numerous times. Best part- if I do have to replace anything, the most expensive part is 40 bucks, and most of them are under 15 bucks. Also, from what I gather on the forums, Flashforge is very understanding when you call them and will even give you free parts if it is an assembly failure.
Okay, some math;
Printer: 970 bucks
Plastic: 120 bucks each pack/gun
Electronics: 100 bucks each pack
Miscellaneous Screws and Glue: 50 bucks each pack
Cabling and Ribbon Cable from GBFans: 100 bucks total
So for 2,150 bucks, a lower price than one aluminum/fiberglass pack ($3,500/estimated) I will be getting four packs/guns. Each of my packs, including the cost of the printer, will end up costing $537.50. Not to mention for about two more PLA spools and some paint (around 70 bucks) I'll be getting three traps, two lifegards, two radios and their holster. Emerging into this world is scary at first, but you'll find there's a huge community (like this one for Ghostbusters) out there to support you. I'll do my best to answer any questions too if you need it, if not on here don't hesitate to email me at- ghostbusterswebseries@gmail.com.
Sorry guys, I will not be selling anything most definitely this year, and quite possibly ever. As cool as it is, the printing and assembly is majorly time consuming, and frankly- this whole thing has made me just want to print tchotchke items with no assembly steps for a while to give my hands a rest. If you do not go down the 3D print route there are plenty of folks who make these things constantly that you can commission (for fear of legality, I won't put them here) but also the anovos kit comes out soon.
Indebted to:
-Scott, Andrew, and Efraim for 3D Printing and Electronics "Tech Support"
-For plans: tgoacher, NewHobbyist, countspatula, daniel_nelms, jason407, and Andrew Snavely all of which utilized the tremendous research done by this awesome community.
-My wife Cassie for letting me chase dreams (which I promise we will make stuff for etsy ONE DAY with this thing)


 - By hawkbatsquadron
 - By mrmichaelt