User avatar
By jackdoud
#4823551
Happy new year everyone! This project was on hiatus for a while as I had other things I needed to work on and the holidays took up my time. Now with the new year I can start moving forward again. My main problem right now is deciding what order to do things in. Given the limited amount of space I have to work with everything will effect everything else so it's a slow process of working everything out simultaneously.

I figured the best place to start would be where I left off with the crank gen ribs. I managed to solder together a set of lights and confirm that they'll fit in the rib and the wiring can be run down the mounts.

Image

I'll probably finish soldering the other 3 sets of lights next then move on to mounting the assembly cage into the pack. I can't install the ribs until the cage is positioned. I may have to switch gears to the gunmount and HGA lights before I do that though as the electronics for all of it sits in the same area and I need to determine the layout. It doesn't really feel like progress but it's another step on the path! :-|
alphabeta001 liked this
User avatar
By jackdoud
#4844530
Ok, almost 10 months since my last post and close to a year since starting the thread, I think it's time for an update.

I got sidetracked on other projects and priorities since my last post but have recently come back around to tinkering with the game pack. After looking over the crank gen ribs I came to the conclusion that I had to get other parts finished first before I could do a final install. Both because I need to know where I have space to mount the control circuits but also I don't want to be manhandling the pack around and accidentally bust a rib.

So my next goal was to build and install the health bar lights. Short of hooking up a EKG and monitoring my vitals if I wanted the healthbar to be anything other then static lights I'd have to work something out. I considered putting them on a timer so the longer the pack was on (and theoretically being worn) the lower the healthbar would go. The better solution was to make them a battery life indicator so I'd know when I was running out of juice. It took a bit of wrestling with the circuit design but I eventually managed to breadboard something that will work with my batteries of choice.

Image

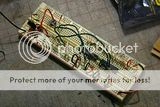
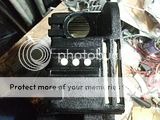
With the circuit designed it was just a matter of fitting it onto a board small enough to go where I wanted it.

Image

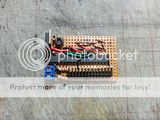
3mm LEDs were soldered onto small strips of perfboard and installed in the pack.

ImageImage

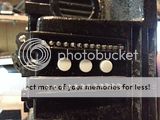
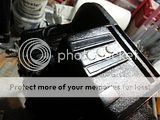
I then covered them with tinted acrylic lenses.

ImageImage

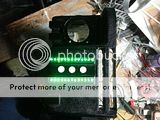
...and we've got lights!

Image

Next I need to make the overheat lightbars. If they were just red LEDs all the way up it'd be easy but of course the first 3 have to shift gradually from yellow to red. There are a couple ways to do this but picking a "best" option is tricky. I really need to work out how I'm driving other parts of the pack in order to make a decision, namely the two bargraphs on the thrower that light simultaneously with the overheat bar.

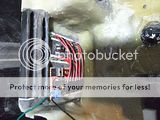
After thinking it over my next course of action was going to have to be assembling the thrower. A few months ago I'd cleaned up the body halves and fiberglassed them together.

Image

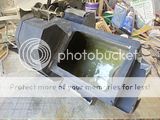
So I pulled everything out on my workbench to look it all over. I'd forgotten just how much work is necessary to get this thing just to the point that I can start thinking about electronics.

Image

So this is where I'm at. Hopefully over the next 2 months or so I can get the thrower assembled to the point that I can work on electronics over the cold months. If I'm really lucky I may even get some paint on the thing.
mburkit liked this
User avatar
By Kingpin
#4844612
The status display's looking pretty good so far. Whilst I know there are tri-coloured LEDs out there, I've no idea if there are ones with red, green and yellow in their configuration... if there were, that'd seem the most obvious choice for the assembly.

That, or a cluster with a ring of yellow/red dual colour LEDs, with a single green LED in the middle.
User avatar
By jackdoud
#4844638
Kingpin wrote:Whilst I know there are tri-coloured LEDs out there, I've no idea if there are ones with red, green and yellow in their configuration... if there were, that'd seem the most obvious choice for the assembly.
I have the LEDs already, it's driving them that I have to decide on.

Funny thing is, the human eye can't actually see yellow. It's a specific combination of simultaneous red and green that gives us the impression of yellow. Bi-color red/green LEDs are just "yellow" LEDs that let you control the outputs.

mburkit liked this
User avatar
By jackdoud
#4877618
Another year, another modest update for this build.

I finally broke this thing out of temporary storage and worked on the thrower some more. My quest to reduce the weight as much as possible continues and I cut out as much superfluous resin as possible.

Image

I got the vac tube sockets fitted and the base of the slime blower nozzle attached:

Image

Just like the health and overheat bars on the pack I installed alcoves for the stasis lights on side of the thrower:

Image

I still need to do some putty work and figure out the stasis lights on the top of the thrower.

..and since it effects things like handle placement, front knob attachment and vent light holes I installed the 4 position rotary switch I bought into the thrower. This makes the top knob functional and will be used as the mode selector for the pack.

Image

I know it may not seem like much progress but as I said when I started this project, everything is tied to everything else and I can't do anything without thinking through how it all works and goes together. I'm hoping to have all the major parts of the thrower prepped and assembled before winter sets in but we'll see how that goes. At this rate I'm shooting to have this project finished by the 10th anniversary of the game's release... :sigh:
KoCo, Grimmy GB, mburkit and 1 others liked this
By thebigone2087
#4877811
I was literally thinking about his thread yesterday. Great to see it back!! Looking great!
User avatar
By jackdoud
#4878793
Spent a bunch of time on the thrower but don't feel like I've gotten much done. Decided to toss everything together just to feel like I've done something and see where I'm at.

Image
Image
Image
Image

Still have a lot to do. Got a bunch more holes to cut out plus making a baseplate, attaching the guntrack and sorting out the slime blower. The bargraphs are turning out to be a particularly tricky part.
Conqueror_Worm, mburkit liked this
User avatar
By jackdoud
#4882225
As pretty as everything is stuck on to this thing it was time to cut more holes so I stripped it all back down again. The bargraph and spinny lights display windows were cut out and lined with styrene lens holders.

ImageImage

I marked out the gun track/base plate and attacked it with my drill press and dremel to remove as much excess resin as possible.

ImageImage

I then made an aluminum baseplate and attached it to the gun track and body with hex bolts.

ImageImage

Next up I cut out the upper bargraph area and constructed the bargraph, instrument bar and trigger box.

Image

With that done it was time to tackle the slime nozzle and front barrel.

ImageImageImage

Still have some detail bits to work out. I need to mount the banjos and make a trigger tip. I'm waiting for my slime hosing to arrive so I can position and attach the rear handle and hose bracket.

ImageImage

I'm getting damn close to being able to prime everything for an initial finish check. I'm sure it's going to need some putty and filler work. All in all the weight doesn't seem THAT bad but I'm sure the electronics and slime are going to make it worse. :whatever:
mburkit liked this
User avatar
By jackdoud
#4883334
It's been a long time coming but all the primary parts are sanded, primed, painted and assembled!

ImageImage

Still a bunch of details to take care of but the thrower is essentially finished. At this point if I really wanted to I could finish up the last few bits and assemble the pack and thrower into a static prop and call it done. Of course that's not going to happen! Now I can start planning out the electronics necessary to take this project over the top. I'm going to start with the base level "pack on and running" lights first then work on each upgrade's peculiarities individually. On the plus side, from here on out progress shouldn't be so weather dependent. :cool:
mburkit liked this
By meleeguy
#4883977
WOW!!!! I am beyond amazed..... I currently am finishing up my GB1 pack and planned on making the GBVG pack as my next one.... Just seeing this makes me realize I have a long road ahead to even come close to your skill. CANNOT WAIT TO SEE THIS FINISHED. Beautiful work.

There's some fun dialogue TV-edits, a replacement[…]

I missed out on the Haslab packs too. I am conside[…]

Thanks The_Y33TER ! Confirmation there's no elect[…]

A little sneak preview of one of the bedrock parts[…]