By Letmebleed75
#451113
So here goes my second attempt at a pack. I was very happy with my first but being it was my first I hope there will be a lot of advances on this pack. So far I've been mounting my aluminum parts from Vinny to the shell and getting as much drilled out an mounted while I wait for my additional parts.

If anyone has any suggestions, please please please share as the eyes of the fan community will help me tremendously. So here we go.

First hour of build in the books.

Image

Image

Image

Image

Image

Image

Image

Image

Image

Image

Image

Image

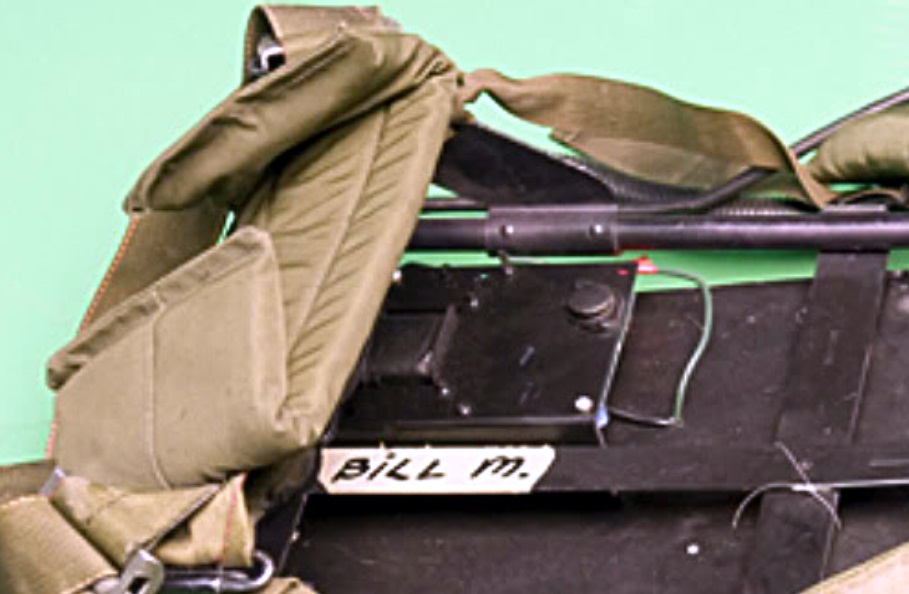
Gonna tackle the nfilter after my work week and figure out how to mount the booster tube. So far working with Vinny's she'll and parts has been an absolute dream. Great quality and has significantly sped up this build compared to my first. This was all done within an hour.
User avatar
By Ejgunth87
#451160
Easiest way that I've found for mounting the booster tube- drill the holes through your shell where you would like them. Hold the booster tube in place, and use a sharpie or spraypaint through the holes onto the booster tube to mark off where the holes are. Pop the booster tube into a vice grip (put cardboard or something to cushion the booster tube in the vice, or it'll leave marks), make sure its level, and drill away!
By Letmebleed75
#451165
Thanks Lundo! I got how to mount it, I should have specified, my biggest problem is finding the perfect spot on the shell to have it. Seems my eyes play tricks on me. It always looks cock eyed or not in the right spot. It's pissing me off lol
By Letmebleed75
#452010
Update time. Got the booster tube mounted.

It looks crooked in the picture, it's just the angle of the camera

Image
Image

Then I got my crank knob mounted. I used a potentiometer so I can try to use it to control the volume of my sound board later. Have no clue how to do it but I'm gonna try.

Image
Image
Image
Image
Image

Got the clippard mounted

Image

Then started the beautiful task of cutting off my n-filter. I first drew the lines for where I wanted to cut. I suggest cutting it off in stages to prevent cutting into the cyclotron.

Image

I used the diamond wheel on my dremel to do the cutting.

Image

Image

Once my dremel gets recharged I'm going to use the sander to clean up what's left.
By Letmebleed75
#452022
Cleaned up around the n-filter

Image

Image

Good fit. Have some slight gaps. Will have to figure out how to fill them.

Image

Image

Image

Image


Sent from my iPhone using Tapatalk 2
Morydees liked this
By Letmebleed75
#452027
Ya I was looking at that. Problem is to push it in more will require to trim off some of the bottom right cyclotron hole. Kinda at a loss trying to figure out how to fix it


Sent from my iPhone using Tapatalk 2
By abaka
#452067
This looks fantastic!! I'd love to get my hands on a bigi shell for a hero build but I don't think I'd ever have the guts to cut out the n-filter!!

I think the packs always look fantastic at this point before the paint goes on when it's metal on fibreglass.
By Letmebleed75
#452081
Thanks for the kind words guys. Abaka the n filter wasn't as bad as I thought it would be. I sanded off a bit to much so in trying to figure out a good solution to fill the gap. So far working with the aluminum parts has been so much easier compared to resin.


Sent from my iPhone using Tapatalk 2
By Letmebleed75
#452090
Wow thanks AJ. I appreciate the words.


Sent from my iPhone using Tapatalk 2
By Letmebleed75
#452102
Also if anyone can help me make a aluminum bracket for the powercell lights, would you pm me? Ill graciously reward you for the help.

Thanks


Sent from my iPhone using Tapatalk 2
User avatar
By julz
#452105
Hey Dude

Looking really good

Grab some 1.5 mm aluminium and make a powercell bracket yourself...
You just need a jigsaw with metal cutting blades or a dremel with metal cutting wheels ( or both!) and a file and or sand paper!

Takes about 20 mins tops ;)
By Letmebleed75
#452107
How do u bend it? Just two clamps?


Sent from my iPhone using Tapatalk 2
User avatar
By julz
#452191
I have a medium size vice... so its easy to clamp it in and bend/hammer it down

Best way to do it, as if you screw one up its easy to quickly make a new one rather than swear heaps and order a new one ;)
By Letmebleed75
#452198
Awesome thanks for the info Julz!


Sent from my iPhone using Tapatalk 2
User avatar
By julz
#452203
Just to show you 1.5 mm aluminium cuts like butter... as you can see I drilled pilot holes for my speaker shelf and then just wized round with the jigsaw. Just go nice and slow and be aware and ready that it could catch the metal occasionally so be ready to get your fingers clear...

Image
By Letmebleed75
#452204
Awesome. Do u have any templates for the bracket? I also need to find templates for the bracket that goes on the other side of the mobo that holds your battery as seen in the planet Hollywood packs


Sent from my iPhone using Tapatalk 2
By abaka
#452230
Letmebleed75 wrote:Awesome. Do u have any templates for the bracket? I also need to find templates for the bracket that goes on the other side of the mobo that holds your battery as seen in the planet Hollywood packs


Sent from my iPhone using Tapatalk 2
I don't believe there was a bracket in that area, I believe that was just the OEM Powertec powersupply spray painted black, someone with more information may be able to confirm this, I'm at work atm so can't dig up the pictures to support this claim, but I will explain why I feel this was the case when I can dig up the picture to support my theory.
By Letmebleed75
#452231
I'm down for any information. Looking to try and be as accurate as possible


Sent from my iPhone using Tapatalk 2
User avatar
By julz
#452297
If you're looking to be as accurate as possible then have a look at this if you haven't already seen it...

Image

As far as I know the only bracket on the back of the original gb1 hero's was the small right angle switchcraft connector shelf that they plugged recharge cords into and possibly turned the pack on i'm assuming. That powertec bracket and power supply came latter if i'm not much mistaken when the murrary pack was being displayed to the public

What I made in my picture was a custom bracket for my speaker to sort of replicate the structure of the original. I'm sort of going accurate with modern twists. I haven't actually made any templates yet but I can when I finish my build. You can work it out with a ruler though. I sort of worked out that that area can support a 20 cm x 18 cm tall shelf. any wider and the edge of the cyc start hitting it.

Image
By abaka
#452302
Image

Image

This picture you can still see the details from the powertec which is what makes me thing this bracket was in fact the switchcraft.

I'm not really sure if it did appear in the movies or was added for display, when I finish my hero, I plan on putting one of them on for looks as I think they look cool and techy!!
lannyjack liked this
By Letmebleed75
#452324
Man these are fantastic pictures and information guys. Thank you thank you


Sent from my iPhone using Tapatalk 2
By Letmebleed75
#452891
Update time

Got my ion arm mounted

Image

Image

Then I closed the initial holes i drilled in the HGA as they were to close together. Waited for the epoxy to dry then sanded down.

Image

Remounted the HGA and re plotted my holes

Image

Bought myself a cheap but works drill press to help with drilling straight

Image

Drilled and tapped the new holes

Image


Sent from my iPhone using Tapatalk 2
By Letmebleed75
#452892
Image

Image

Image

Image

I then tackled getting the N-Filter attached to the shell. I first used two part quick set epoxy gel to spot hold the filter in place. Then I used steel epoxy to actually attach it to the shell.

Image

Image


Sent from my iPhone using Tapatalk 2
By Letmebleed75
#452893
I used a small wooden Popsicle stick to stop the putty from oozing out from the bottom of the N-Filter.

Image

Image

Image

Image

As you can see in these pictures, I ended up sanding too much off the shell. So I'm using bondo to help seal the small cracks around the N-Filter to make it look less "hacked into the shell."

Image

Image


Sent from my iPhone using Tapatalk 2
By Letmebleed75
#452894
Image

Image

Image

Image

Image

I used multiple layer sanding in between each layer with 400 grit sand paper. I then used a metal pick to help scrape away the excess bondo.


Sent from my iPhone using Tapatalk 2
By Letmebleed75
#452895
Image

Image

Image

Then I noticed when I put my legris straights in I stupidly cracked the first layer of the shell. So I pulled the straights out, pulled off the cracked layer and started doing some bondo work with the shell. Once again multiple small layers with slight sanding in between each layer with 400 grit.

Image

What a stupid noob move. Ugh hurts so much to see.

While I was doing the bondo work I drilled out the holes for my PPD.

Image

Image

Almost done with the bondo work. Just have to sand down and make sure its even.

I used two metal dowels to put into the ppd to mount to the shell.

Image

Image

Image


Sent from my iPhone using Tapatalk 2
By Letmebleed75
#452896
Image

Switched out the stock clippard screws for correct hex screws.

Image

Then used wooden dowels to attach the split loom to the shell.

Image

Image

Image

Image

All comments are warmly welcomed as I'm still learning. I'm taking a lot of pictures so hopefully this build will help other new builders like my self to not make the mistakes I have.


Sent from my iPhone using Tapatalk 2

The_Y33TER , since the majority of the maker scen[…]

Thanks The_Y33TER ! Confirmation there's no elect[…]

A little sneak preview of one of the bedrock parts[…]

Where do the other ends of the red/yellow wire[…]